3D Areola & Nipple Reconstruction

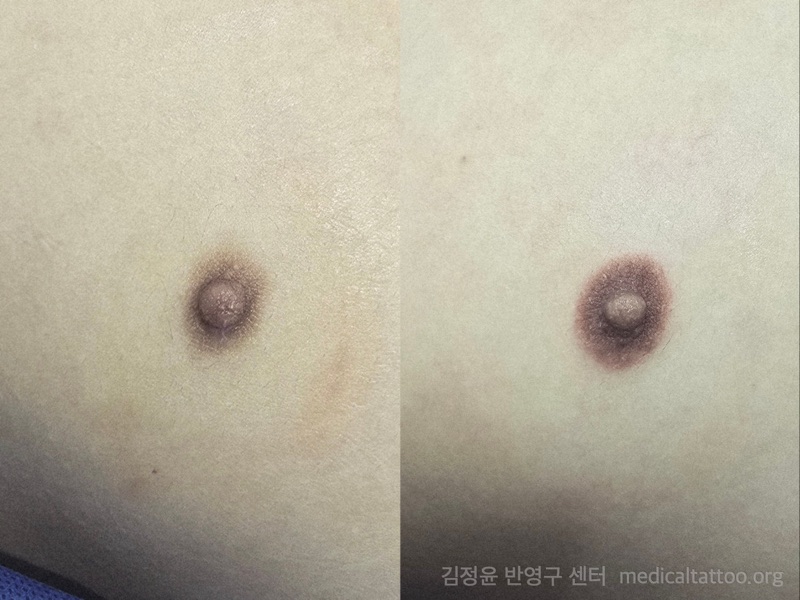
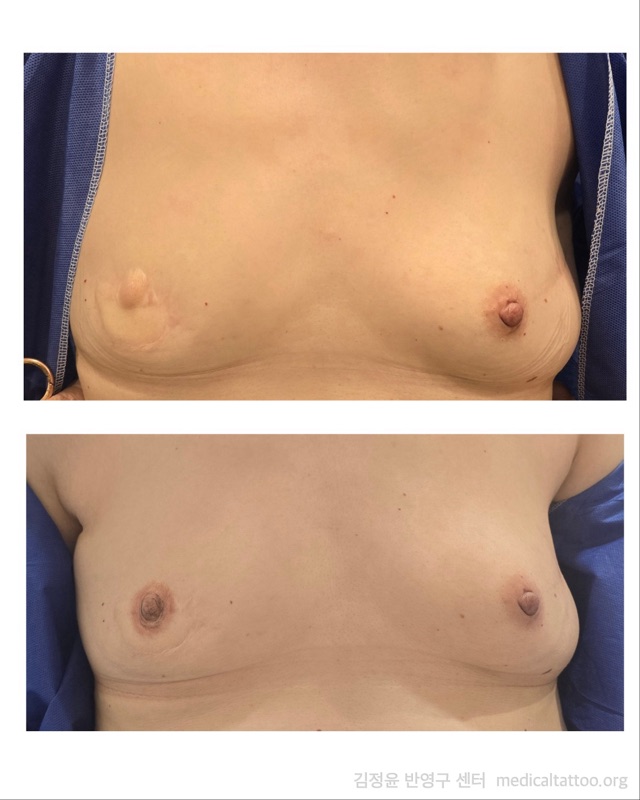
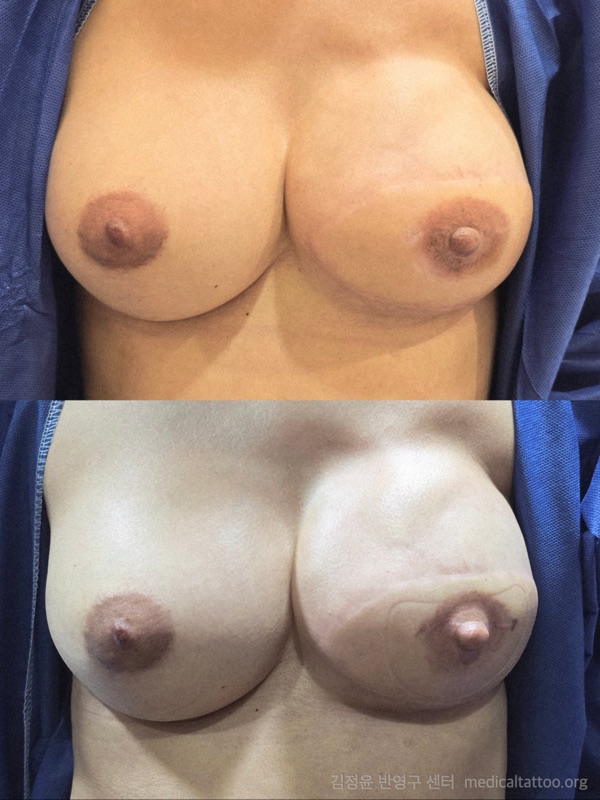
After breast cancer surgery and reconstruction, we redraw areolas and nipples that have lost color or faded, using medical tattooing. We match the color to the other side and create a sense of volume through shading.

Director Jeongyoon Kim is herself a breast cancer survivor. Having been in the same place, she brings both skill and genuine understanding to every procedure.
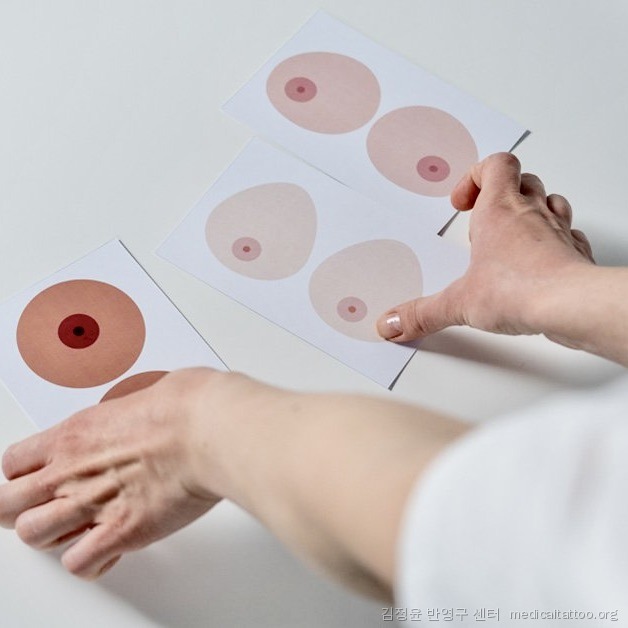
Areola reconstruction design reference

Who this is for

When reconstruction is done but something is still missing

  • No color where the areola should be after breast reconstruction
  • Had nipple reconstruction but the color faded or it flattened
  • Noticeable difference in color, size, or position from the healthy side
  • Told elsewhere that the skin is too thin or too light for tattooing
  • Want to cover scars from inverted-nipple or breast surgery
  • Scarring at the areola border after reduction, lift, or augmentation
  • Male breast cancer, trauma, or congenital absence requiring areola reconstruction

Timing

We proceed once the surgical site has fully stabilized — typically 6–12 months after surgery, once swelling and redness have subsided. The exact timing is determined together with your surgeon's guidance and an in-person skin assessment.

Duration & sessions

Each session takes about 2–3 hours including design. The full result is completed over 2–3 sessions.

The process

From consultation to touch-up — by the director herself

  1. Consultation & designWe review your surgery history, timing, and skin condition. Using the other areola as reference, we draw the size and position, then mix multiple pigments to match your skin tone.
  2. Session 1 — Base colorWe set the base color considering your skin tone and the other areola. Multiple pigments are blended for realism. The areola shape already becomes visible at this stage.
  3. Session 2 — Color & dimensionAbout 6 weeks after Session 1. We fine-tune color and add shading for three-dimensional depth.
  4. Session 3 — DetailWe add Montgomery tubercles (the small bumps on the areola surface) and fine textural details for a natural finish. Some cases are completed in Session 2.

The difference

Glossy 3D — volume and texture together

Montgomery tubercle recreation

We reproduce the small bumps naturally present on the areola surface. This detail is what creates balance with the other side and eliminates the artificial look.

Nipple shadow technique

Even when a reconstructed nipple has flattened over time, our shading technique can make it appear two to three times its actual height.

Certified pigments & natural gradation

We use US-manufactured medical tattoo pigments (safety-certified, cruelty-free). A natural gradient that fades toward the outer edge, combined with individually mixed pigments matched to your skin tone, creates a realistic result.

Suitability

What to check before the procedure

We assess your condition before proceeding to ensure safety and the best result. Please mention any of the following during consultation.

Not recommended

  • Active skin conditions (eczema, psoriasis, etc.) at the treatment area
  • Diagnosed keloid tendency
  • Less than 6 months since reconstruction surgery

Requires doctor clearance

  • Currently undergoing or just finished chemo/radiation
  • Slow wound healing due to diabetes or autoimmune conditions
  • Taking blood thinners (aspirin, warfarin, etc.)
  • Pregnant or breastfeeding

Case-by-case

  • Previous areola tattoo that needs correction
  • Skin thinned by radiation therapy
  • Thick scar tissue

Not sure? Send us a photo and we'll let you know.

Before & After

Areola & nipple reconstruction cases

These images contain post-surgical photos and are hidden by default.
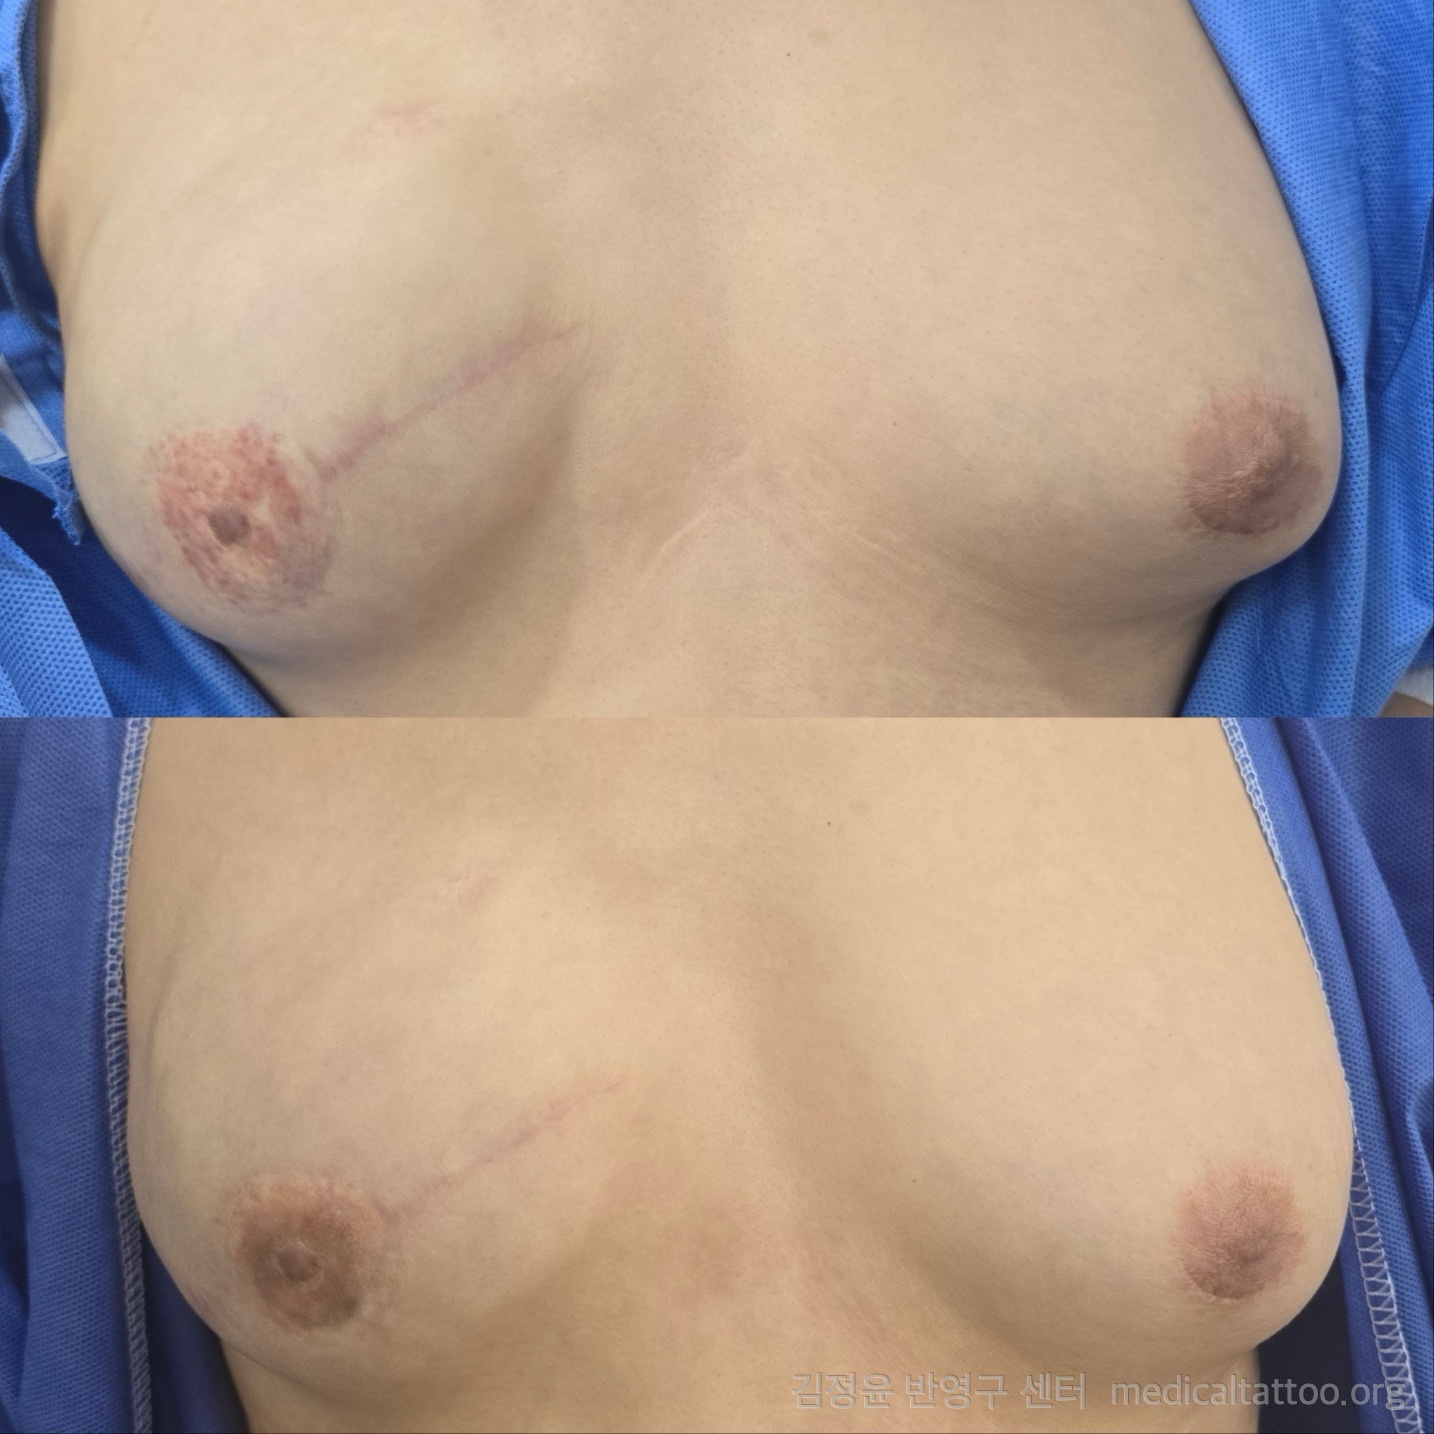
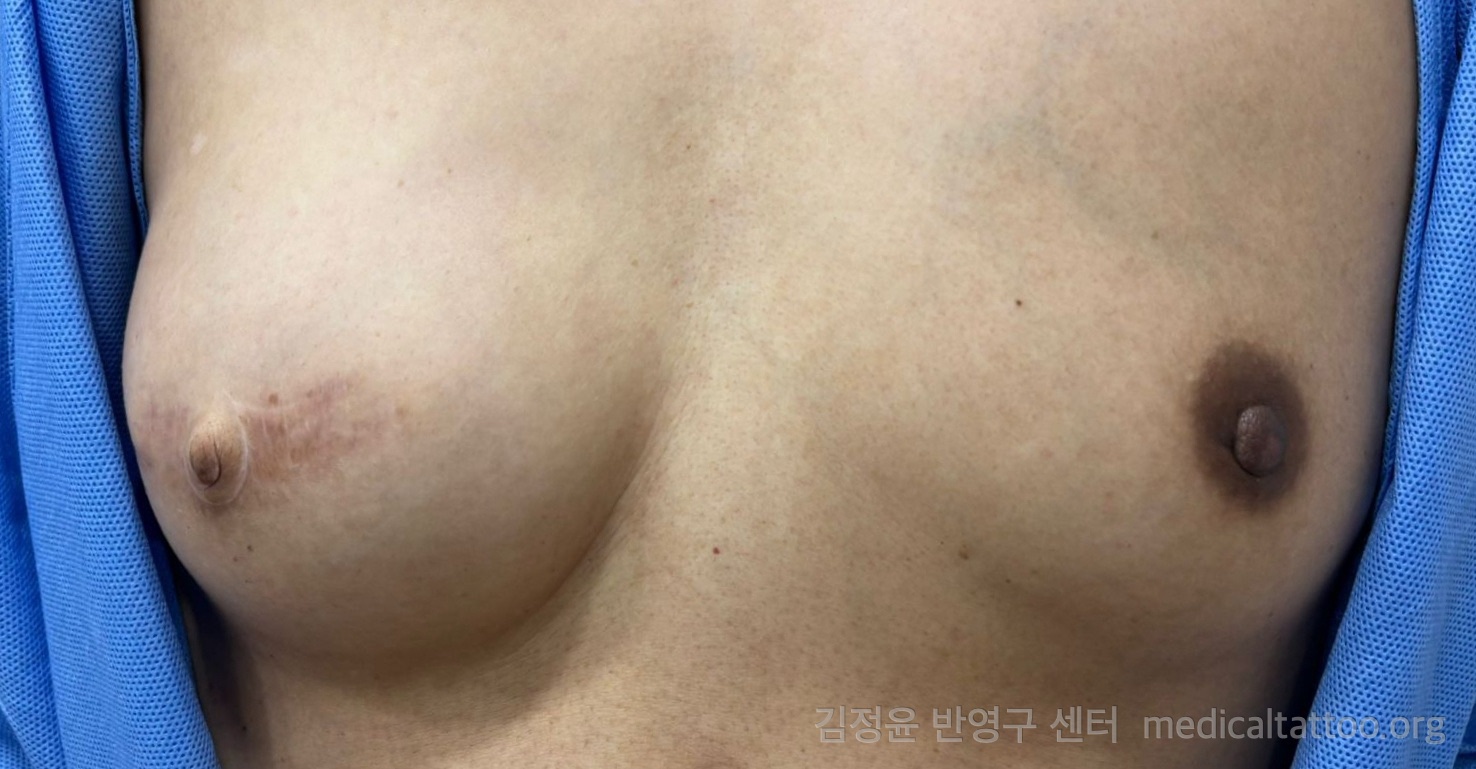
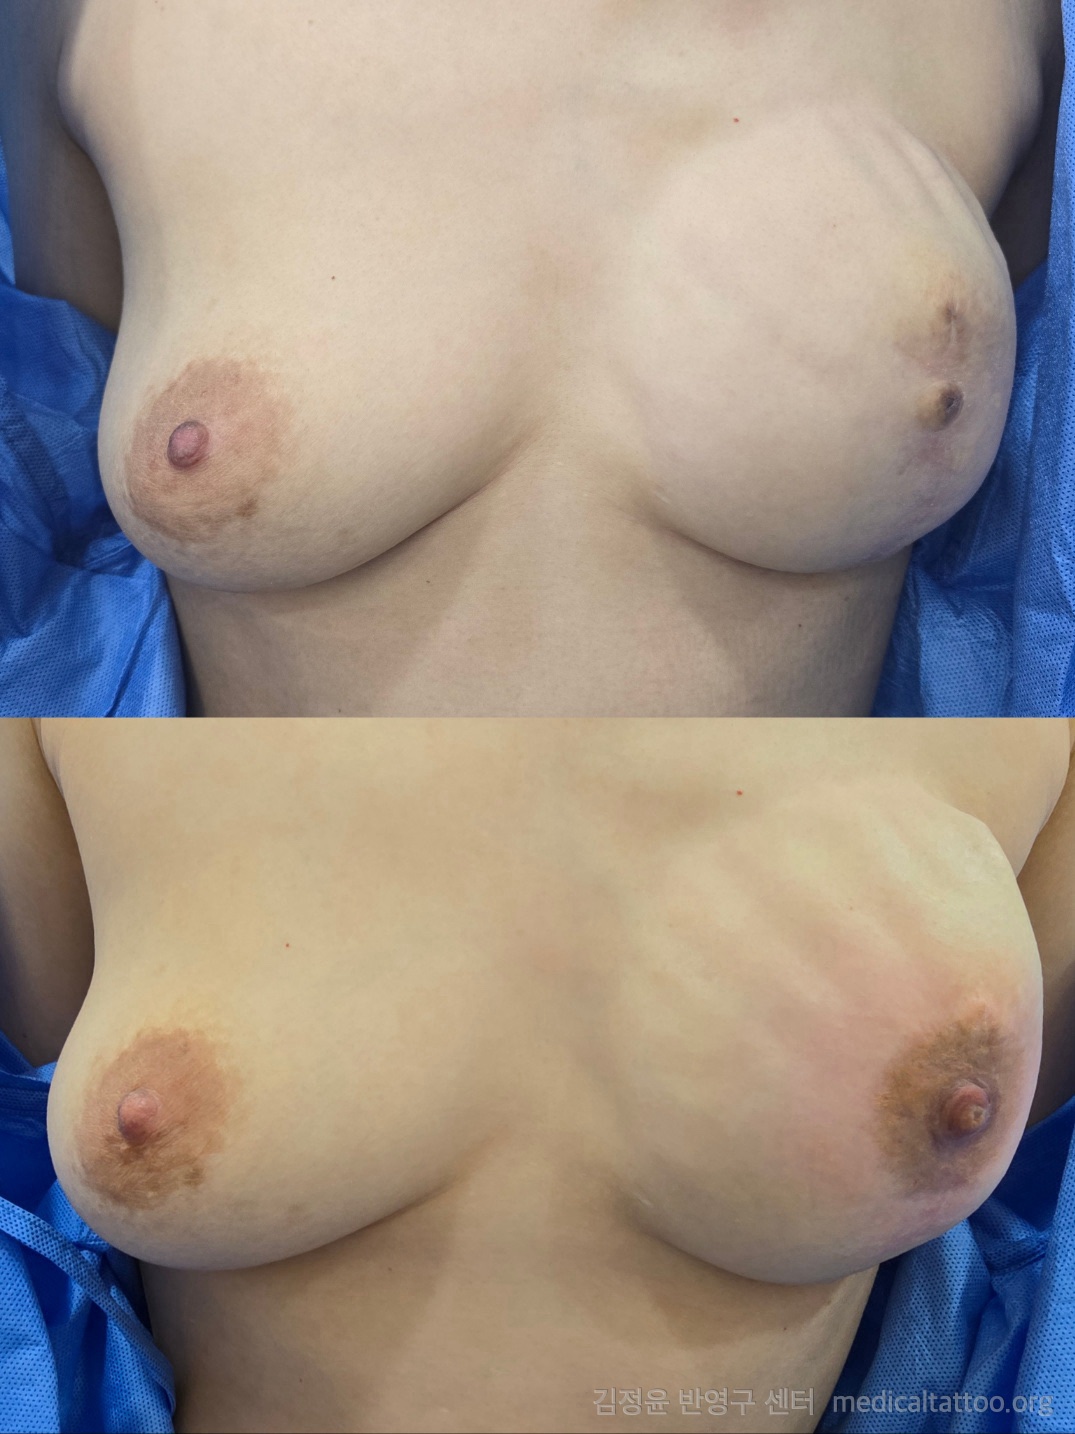
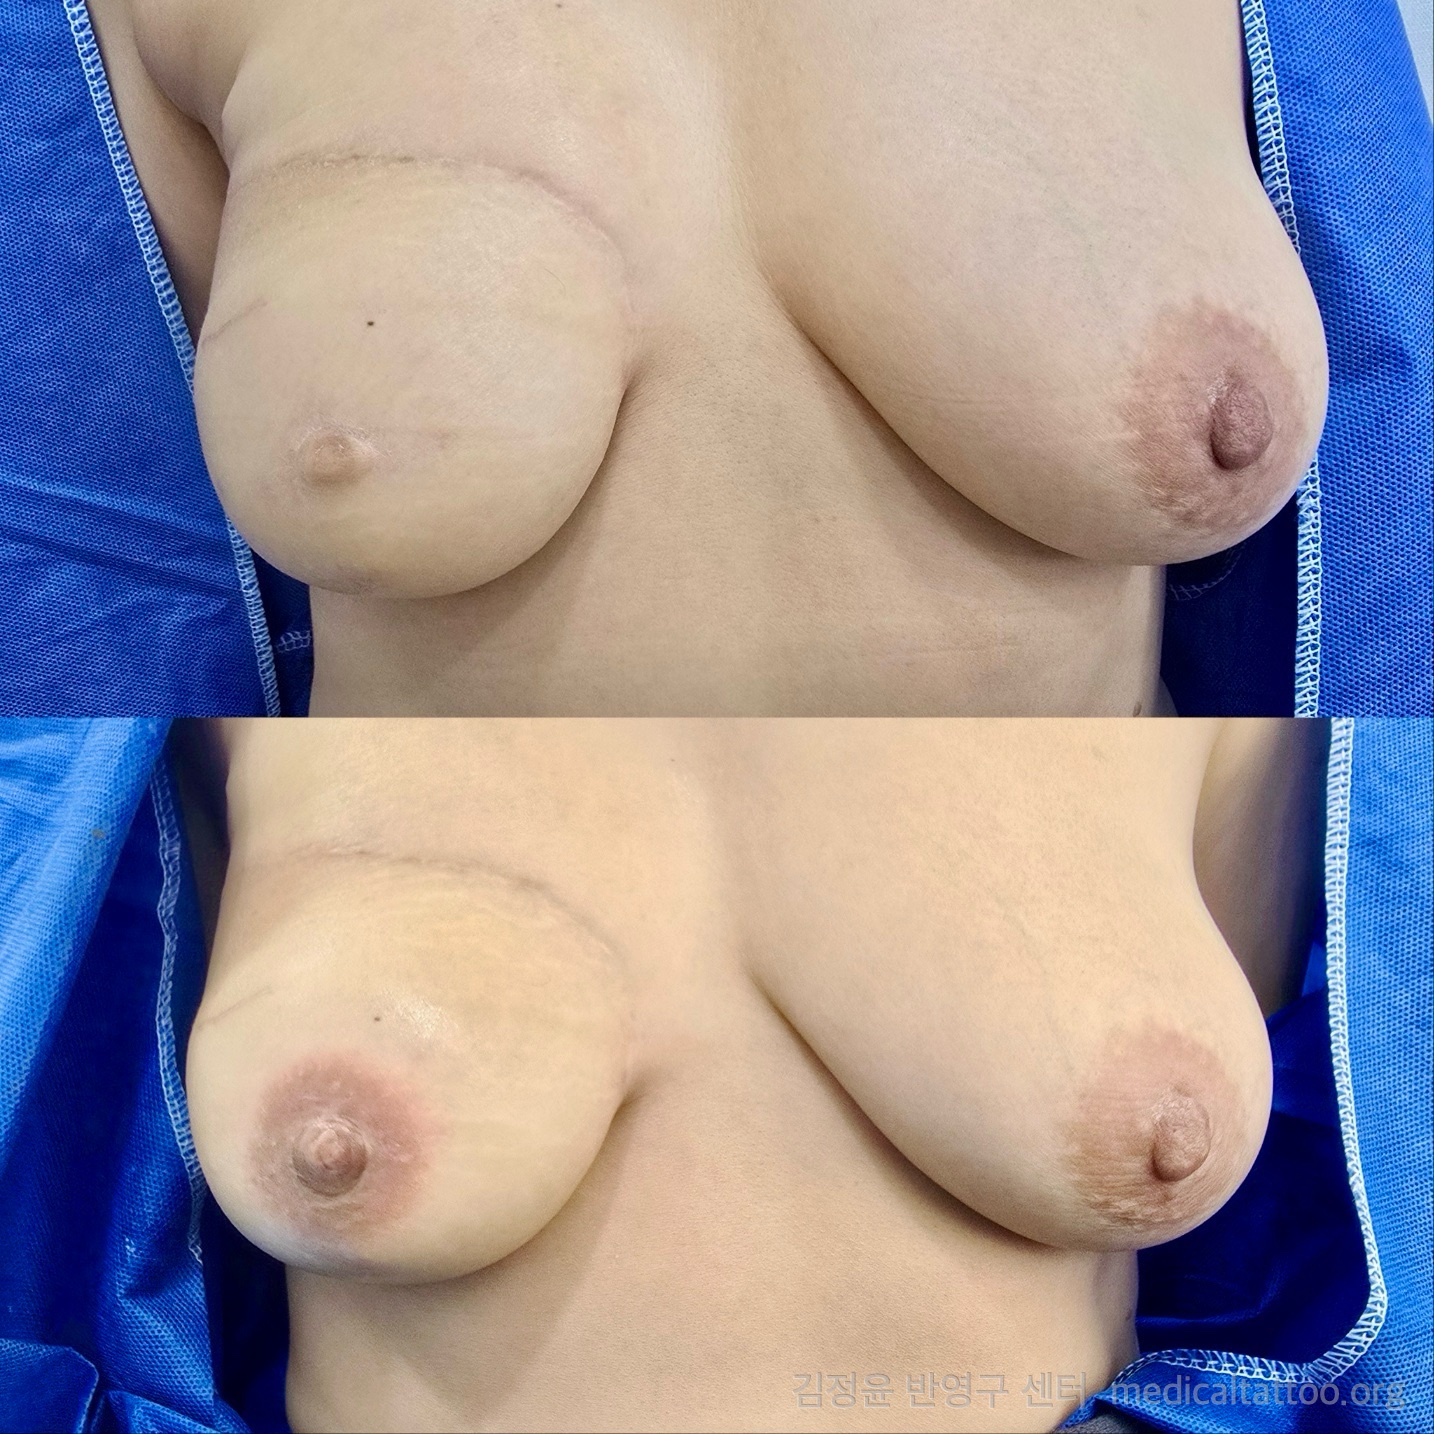
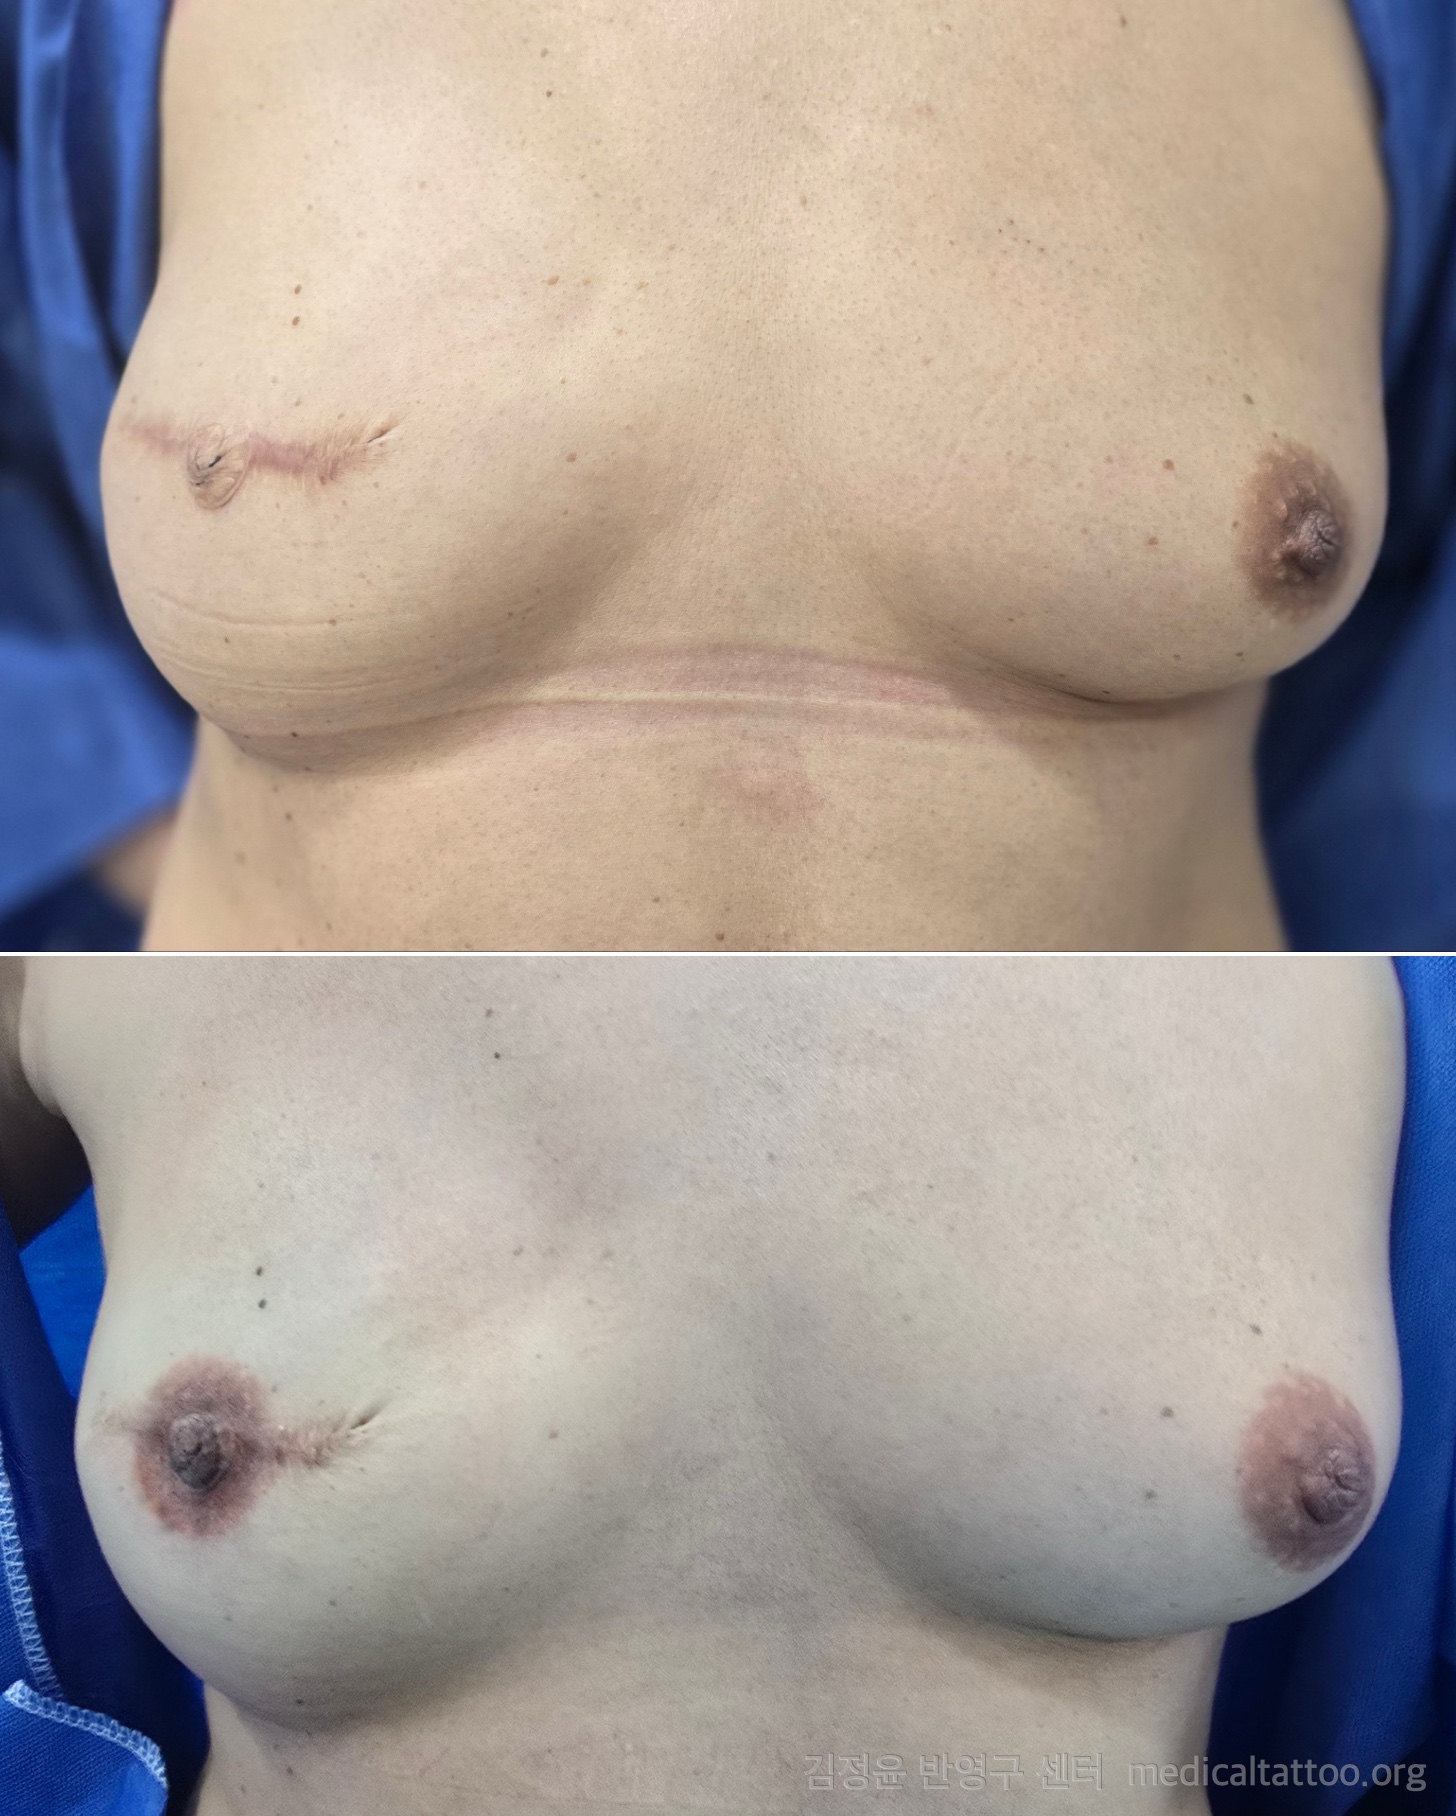
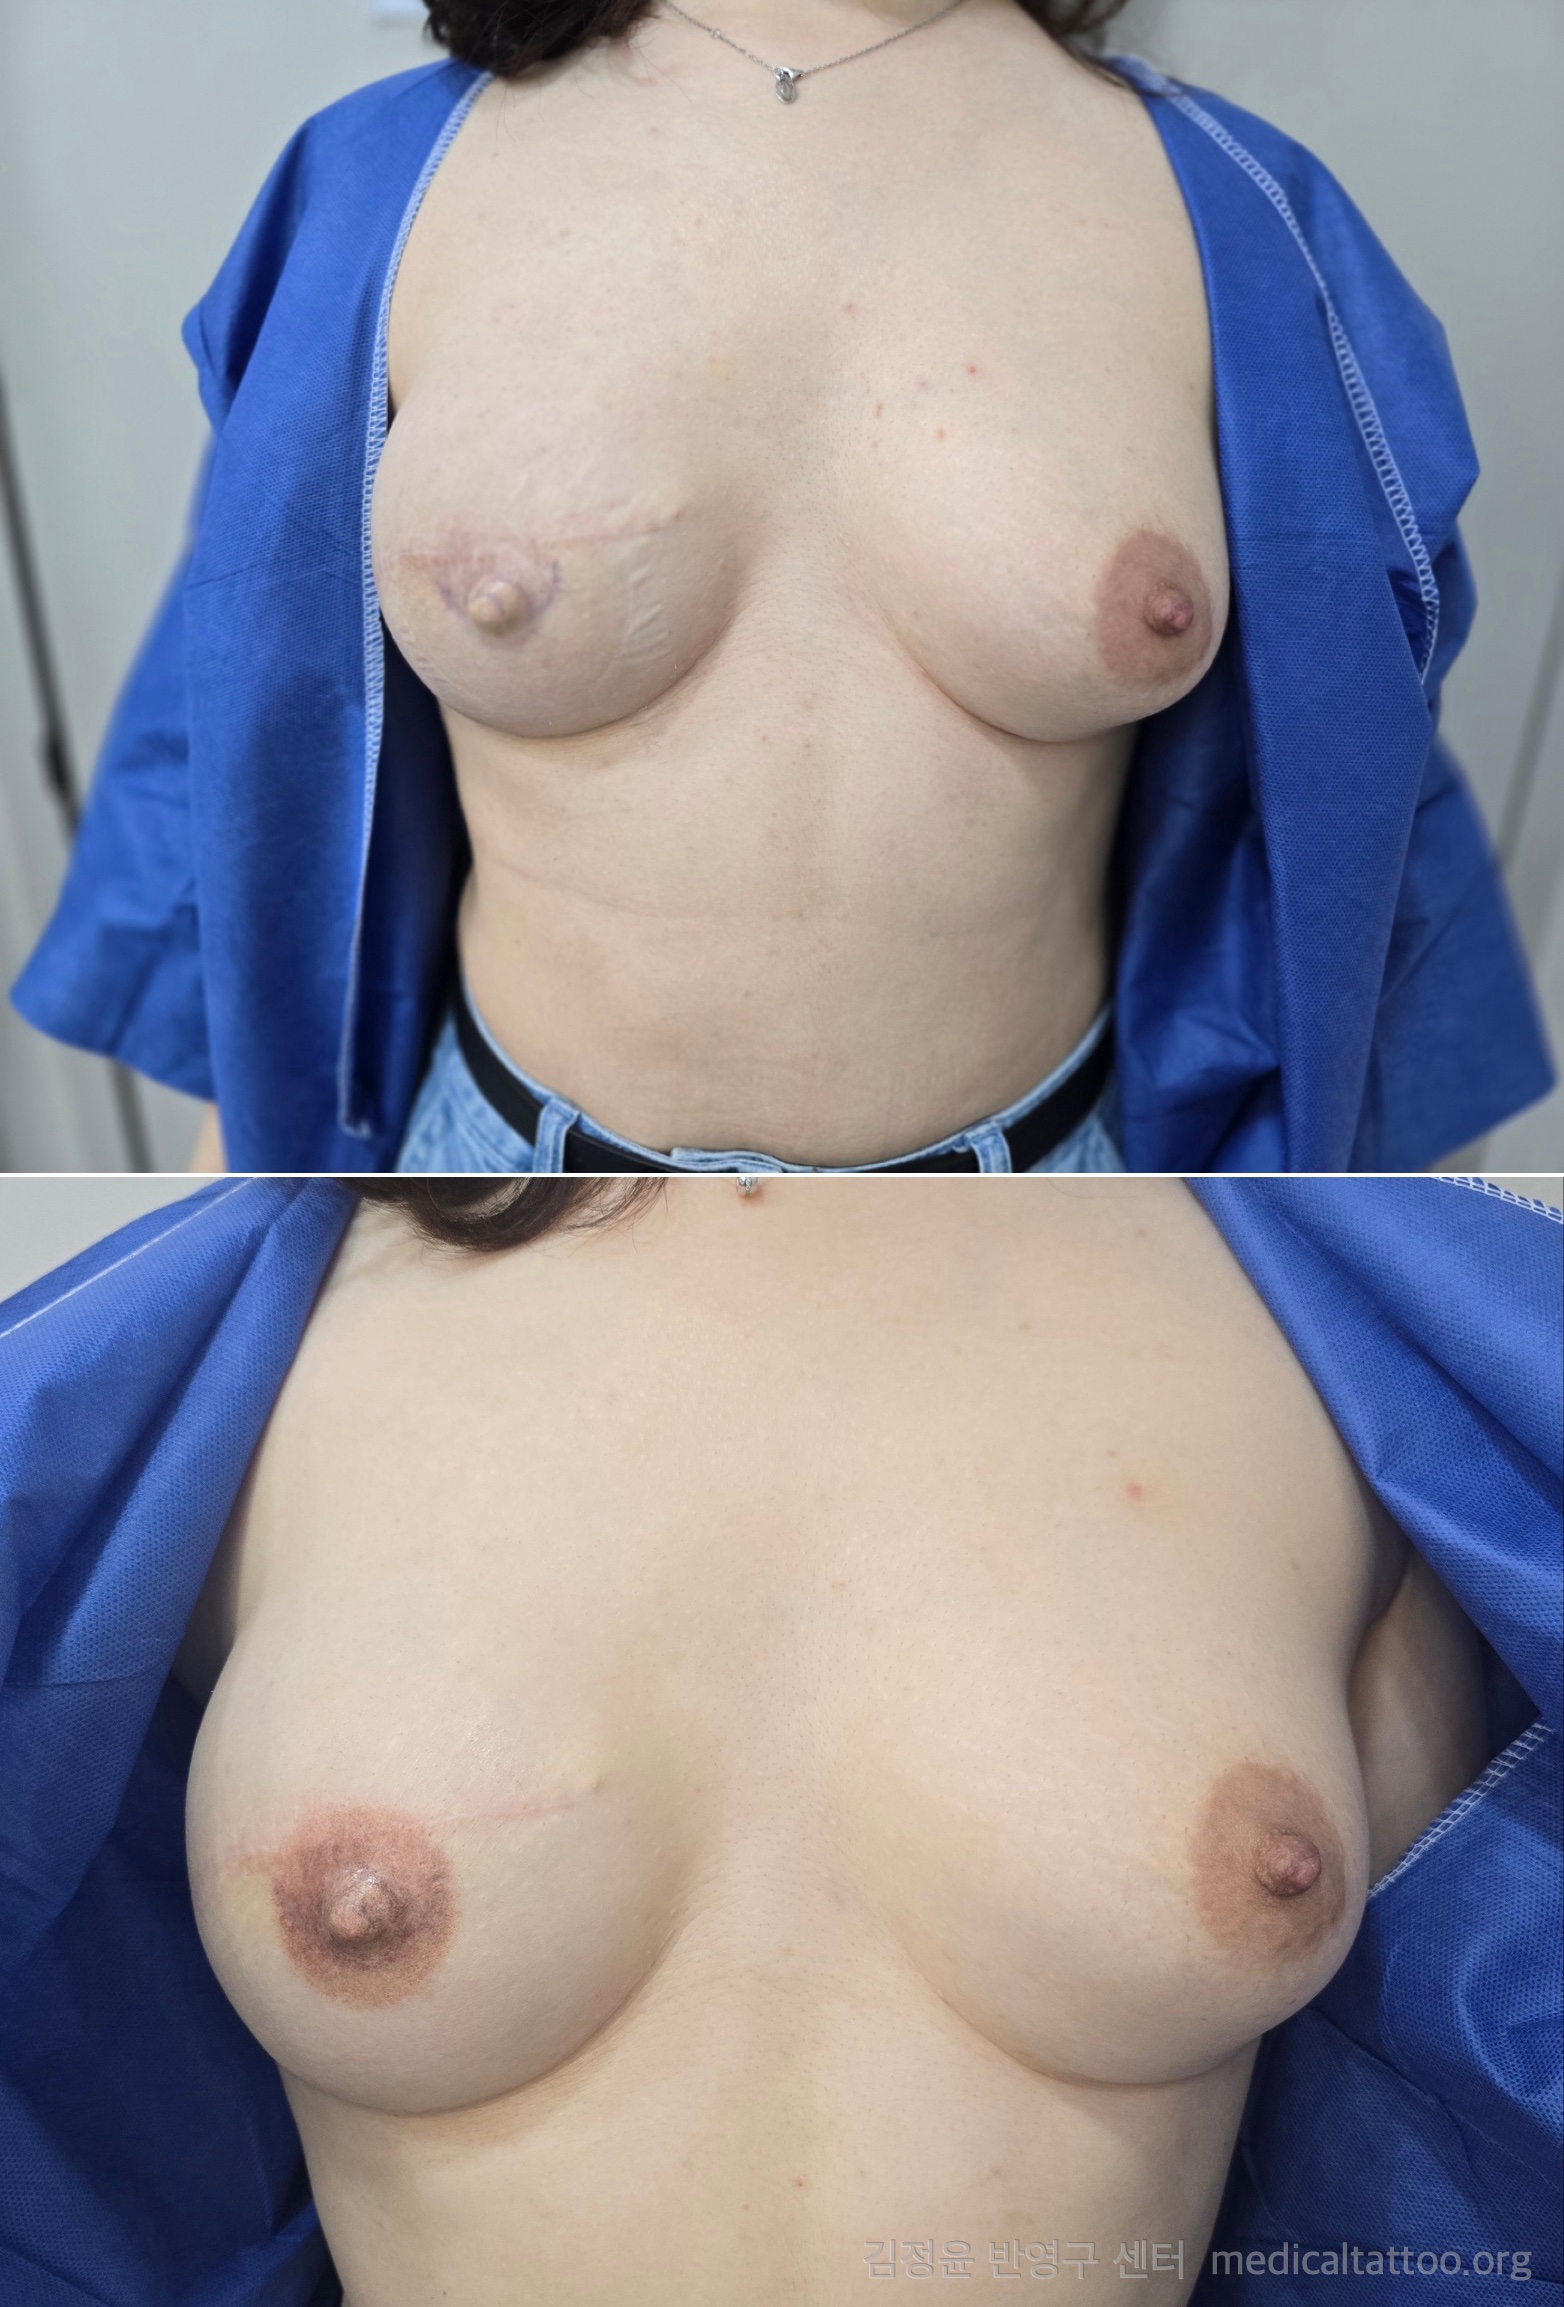
Case A · Areola restoration after breast surgery 20 years agoThe reconstructed breast had completely lost its areola pigment over two decades, leaving one side visibly flat. Because the skin had thinned and lost elasticity over time, pigment depth and density had to be carefully calibrated. The opposite areola was precisely measured for size, shape and color; the center was given a deeper tone for dimension while the outer edge was softly gradient-blended into the surrounding skin. Highlights and shading on the nipple area added visual volume, and the final result balanced both sides to significantly reduce self-consciousness.
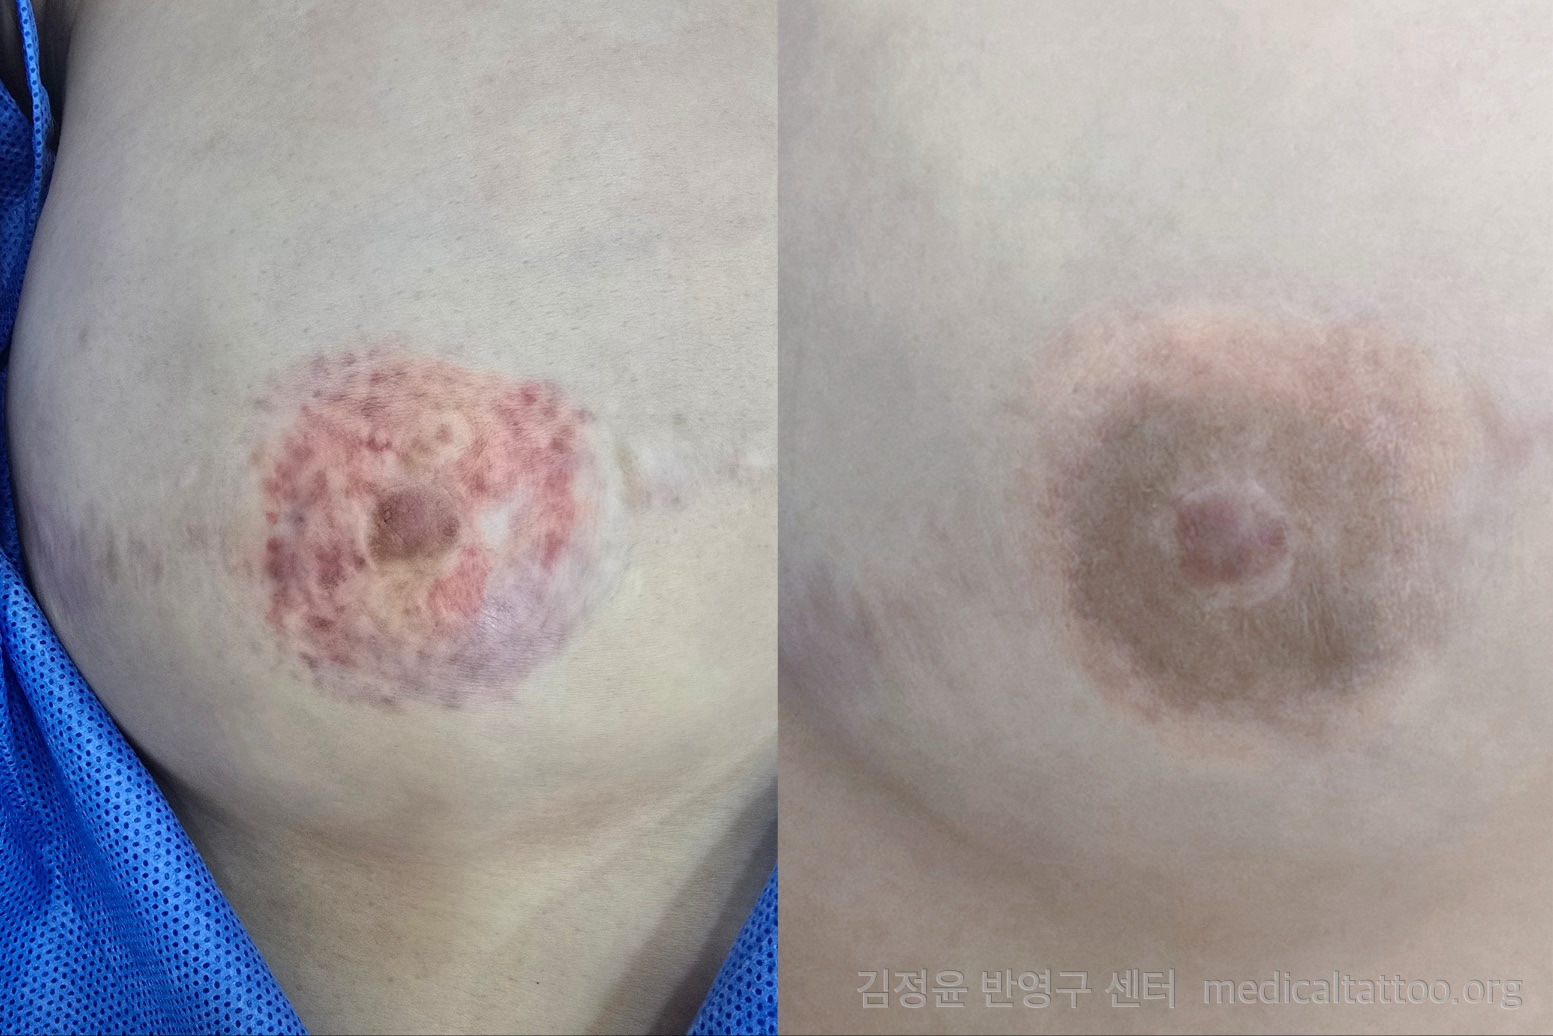
Case B · Faded color after nipple reconstruction before and after
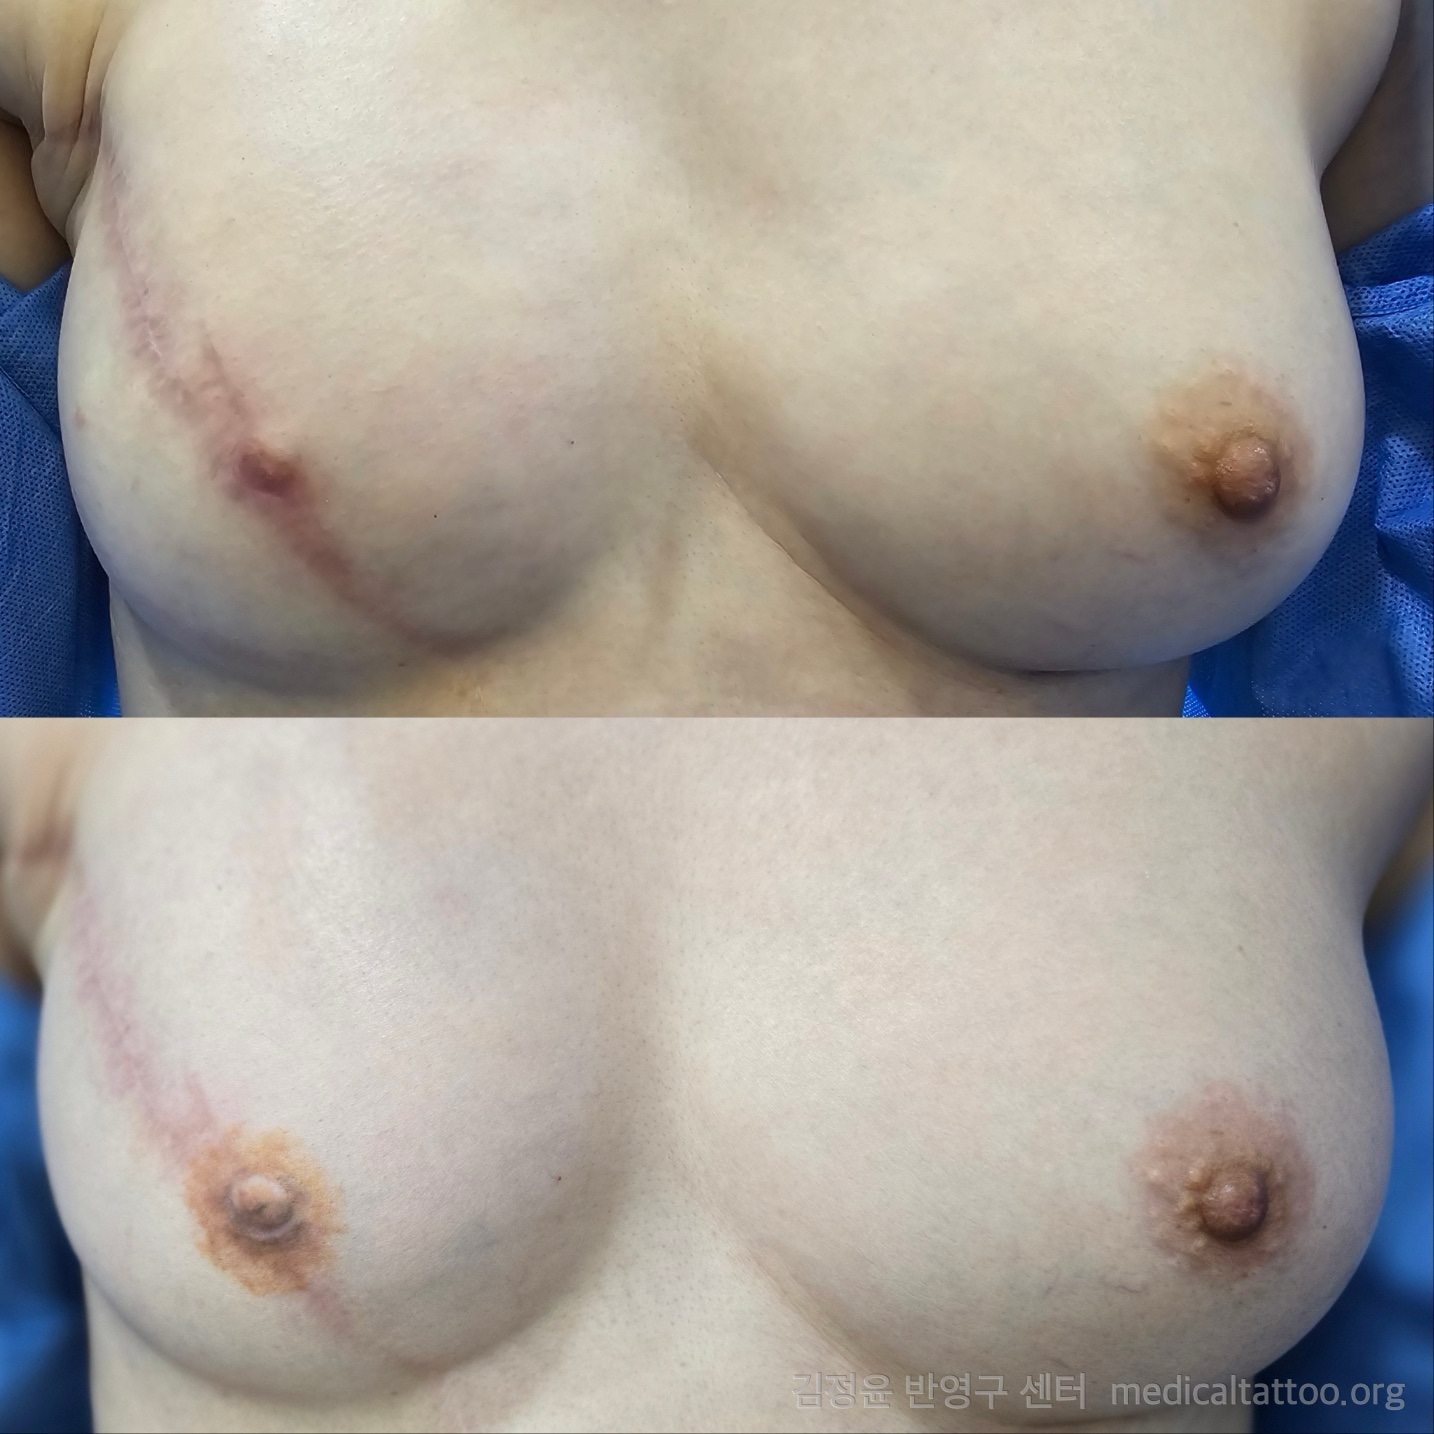
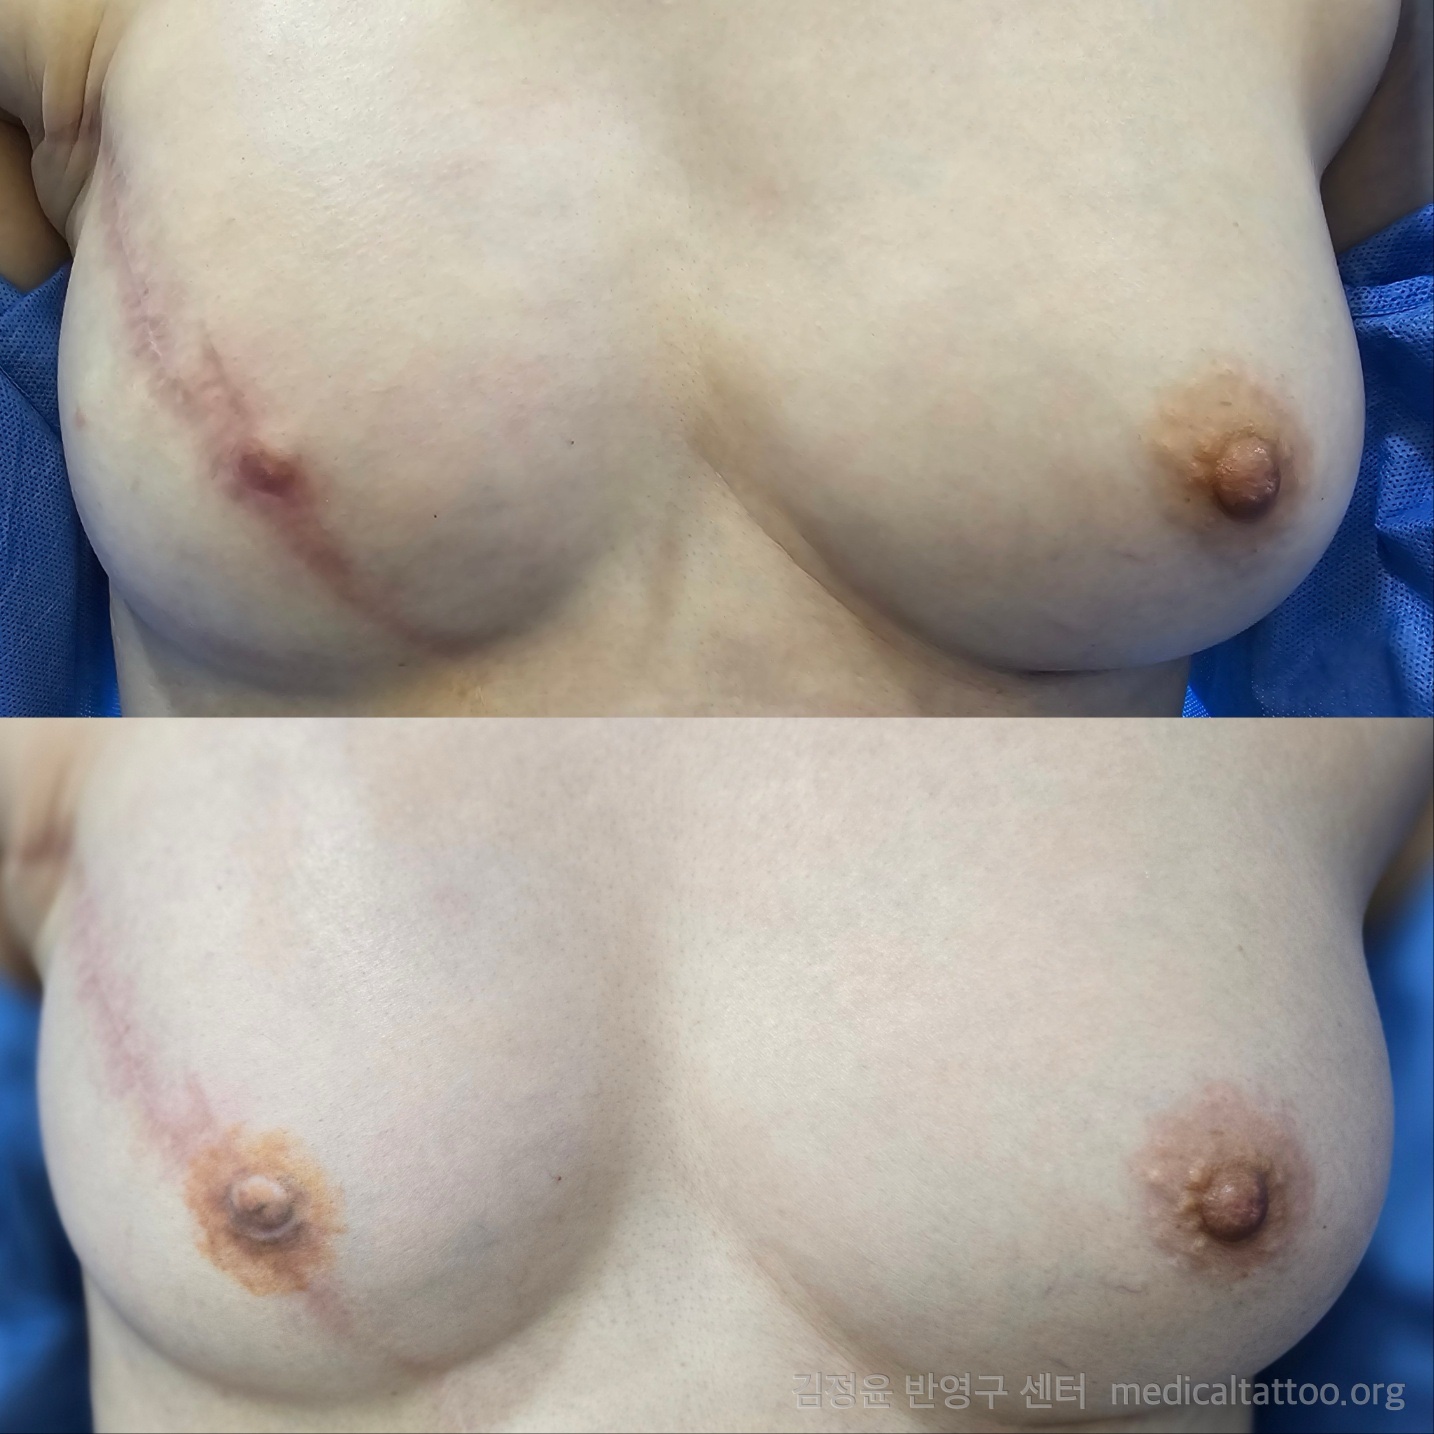
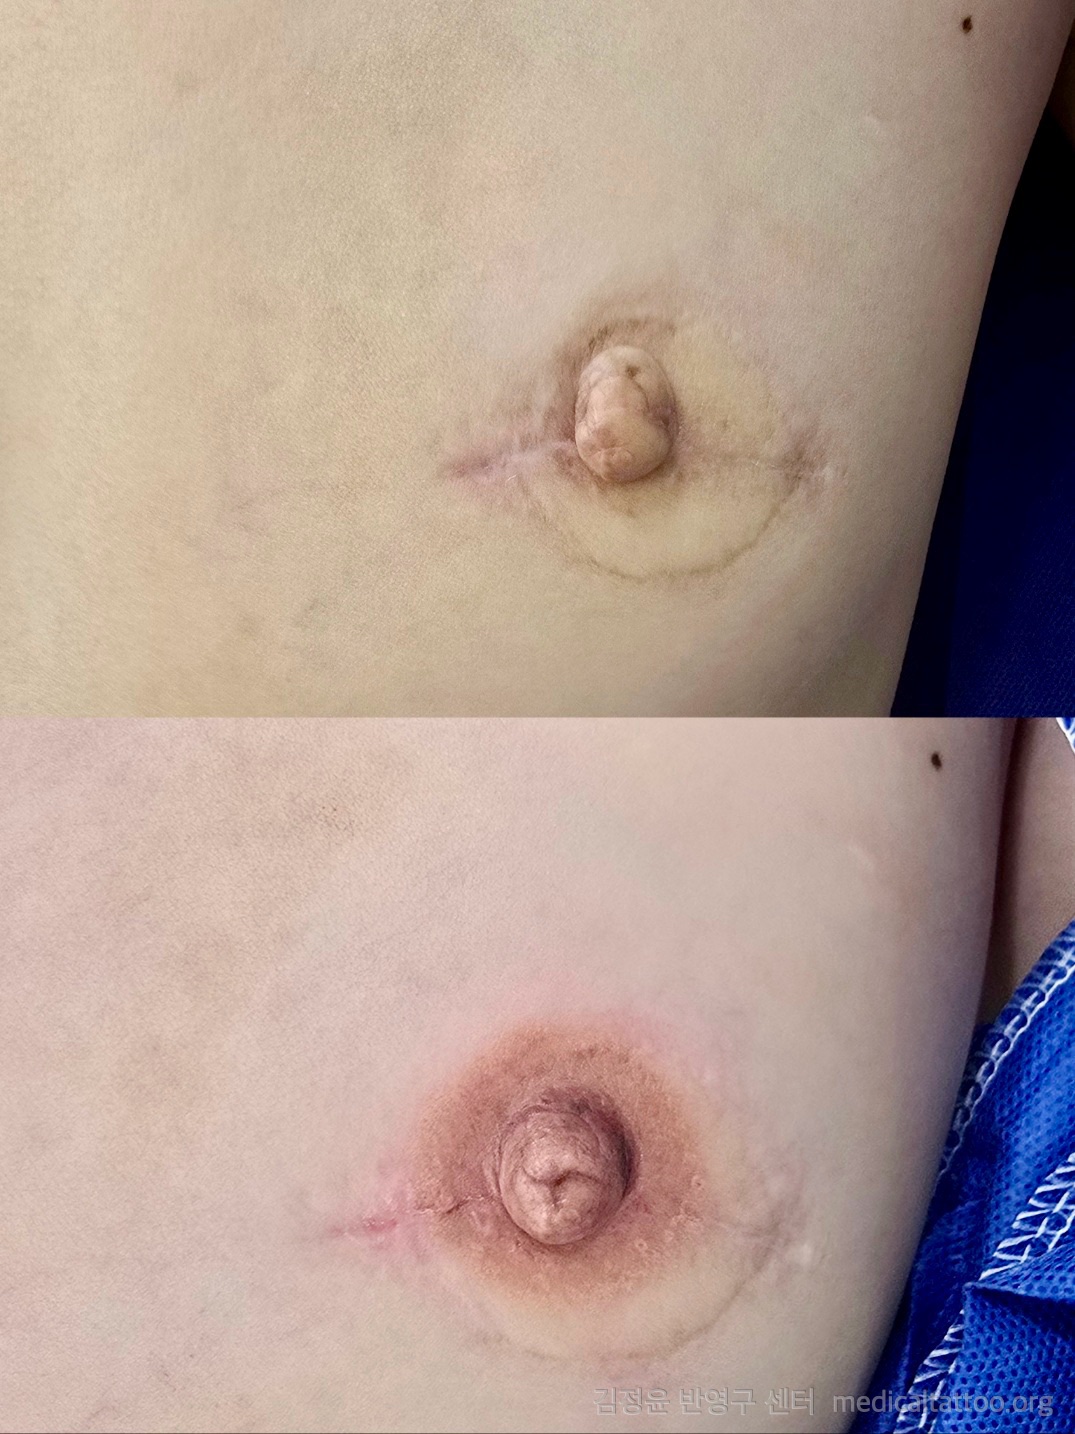
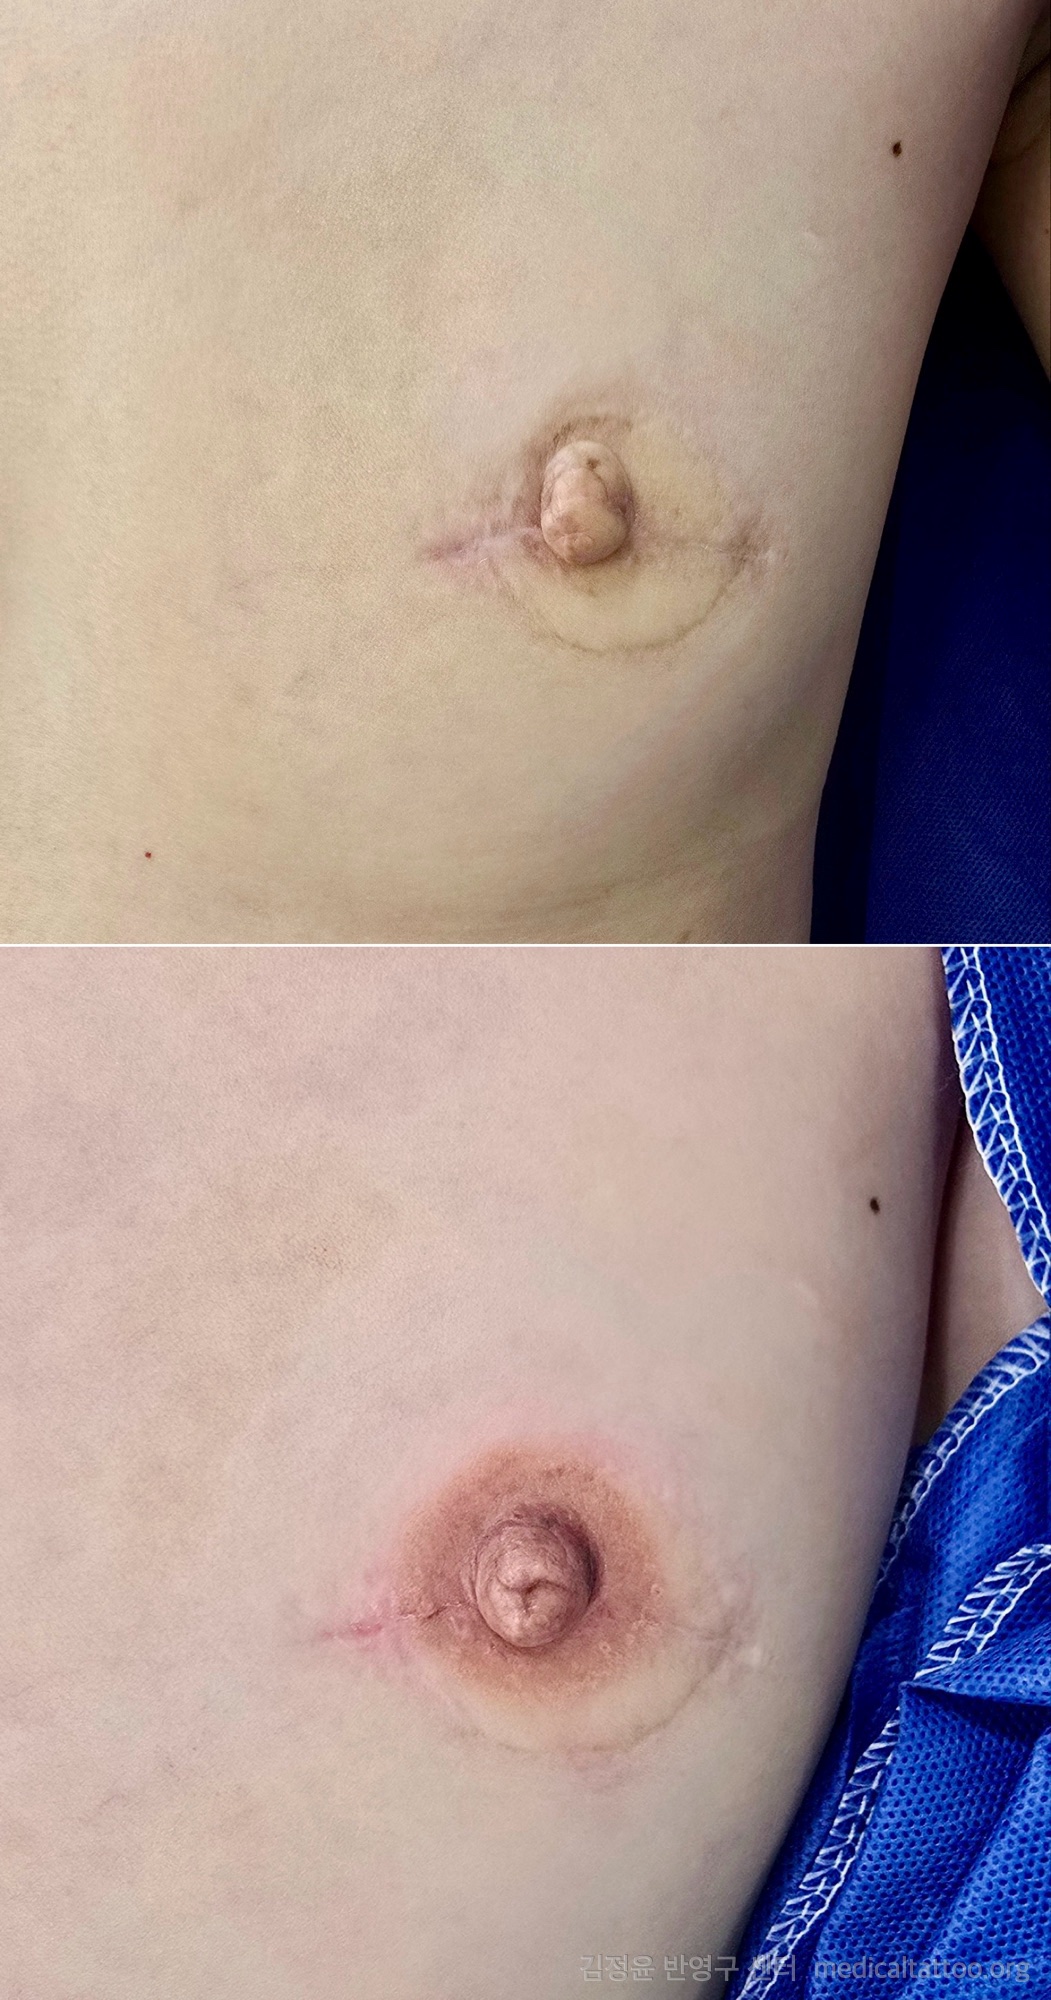
Case B · Faded color after nipple reconstructionAfter breast reconstruction and surgical nipple restoration, the reconstructed nipple gradually lost nearly all its color over time. Although the surgical form remained, the absence of pigment left the nipple looking flat and undefined. Natural nipple coloring was recreated by concentrating deeper tones at the center and softly diffusing color toward the edges. The areola was also matched in size and tone to the opposite side. After the initial session and a stabilization period, fine color adjustments were made during the touch-up to complete the result.
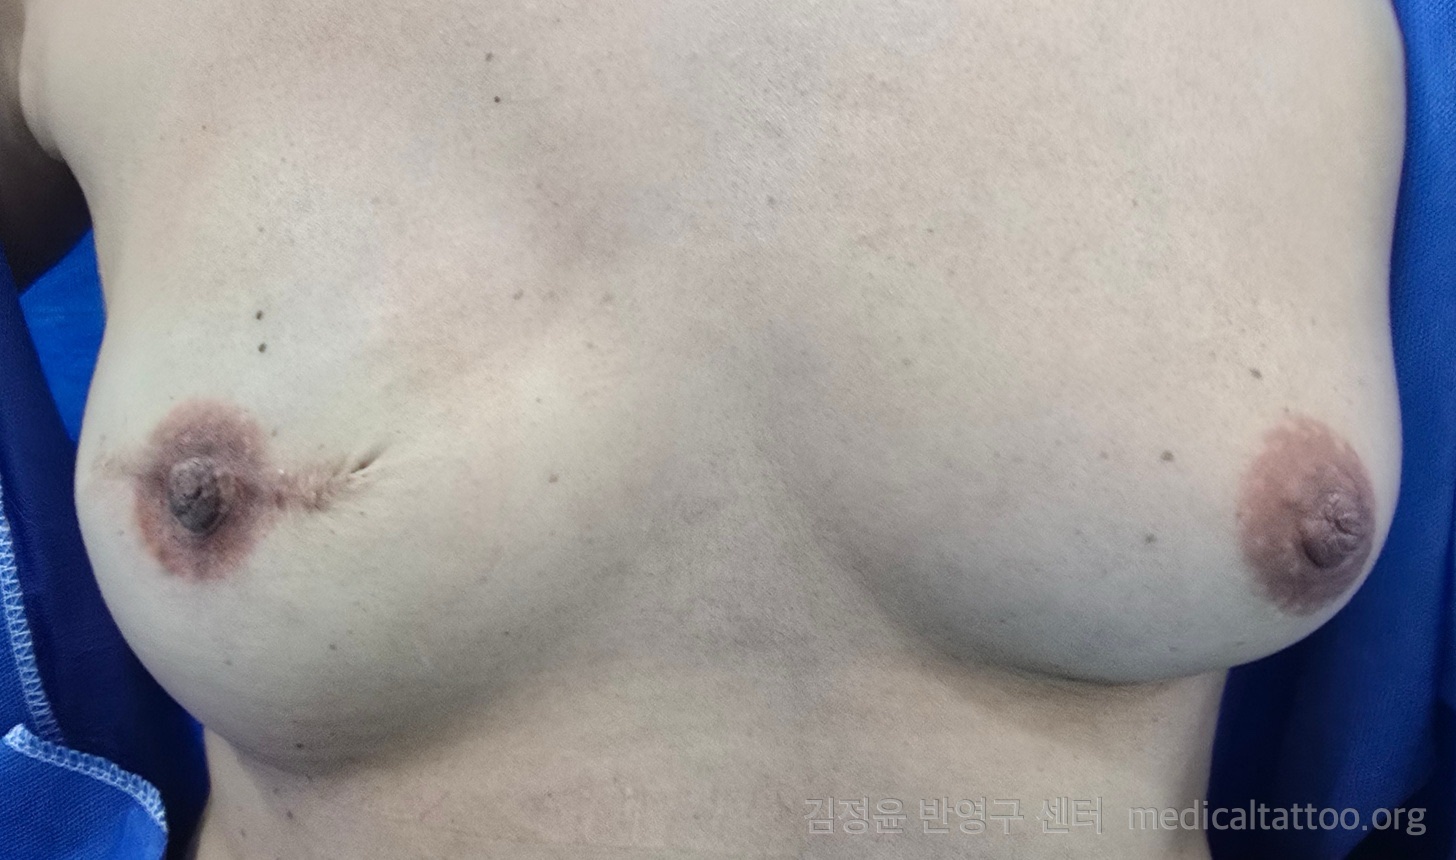
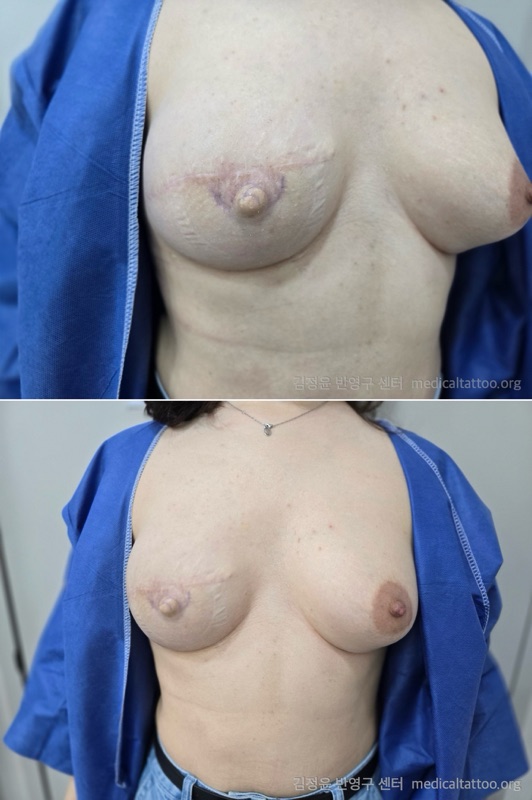
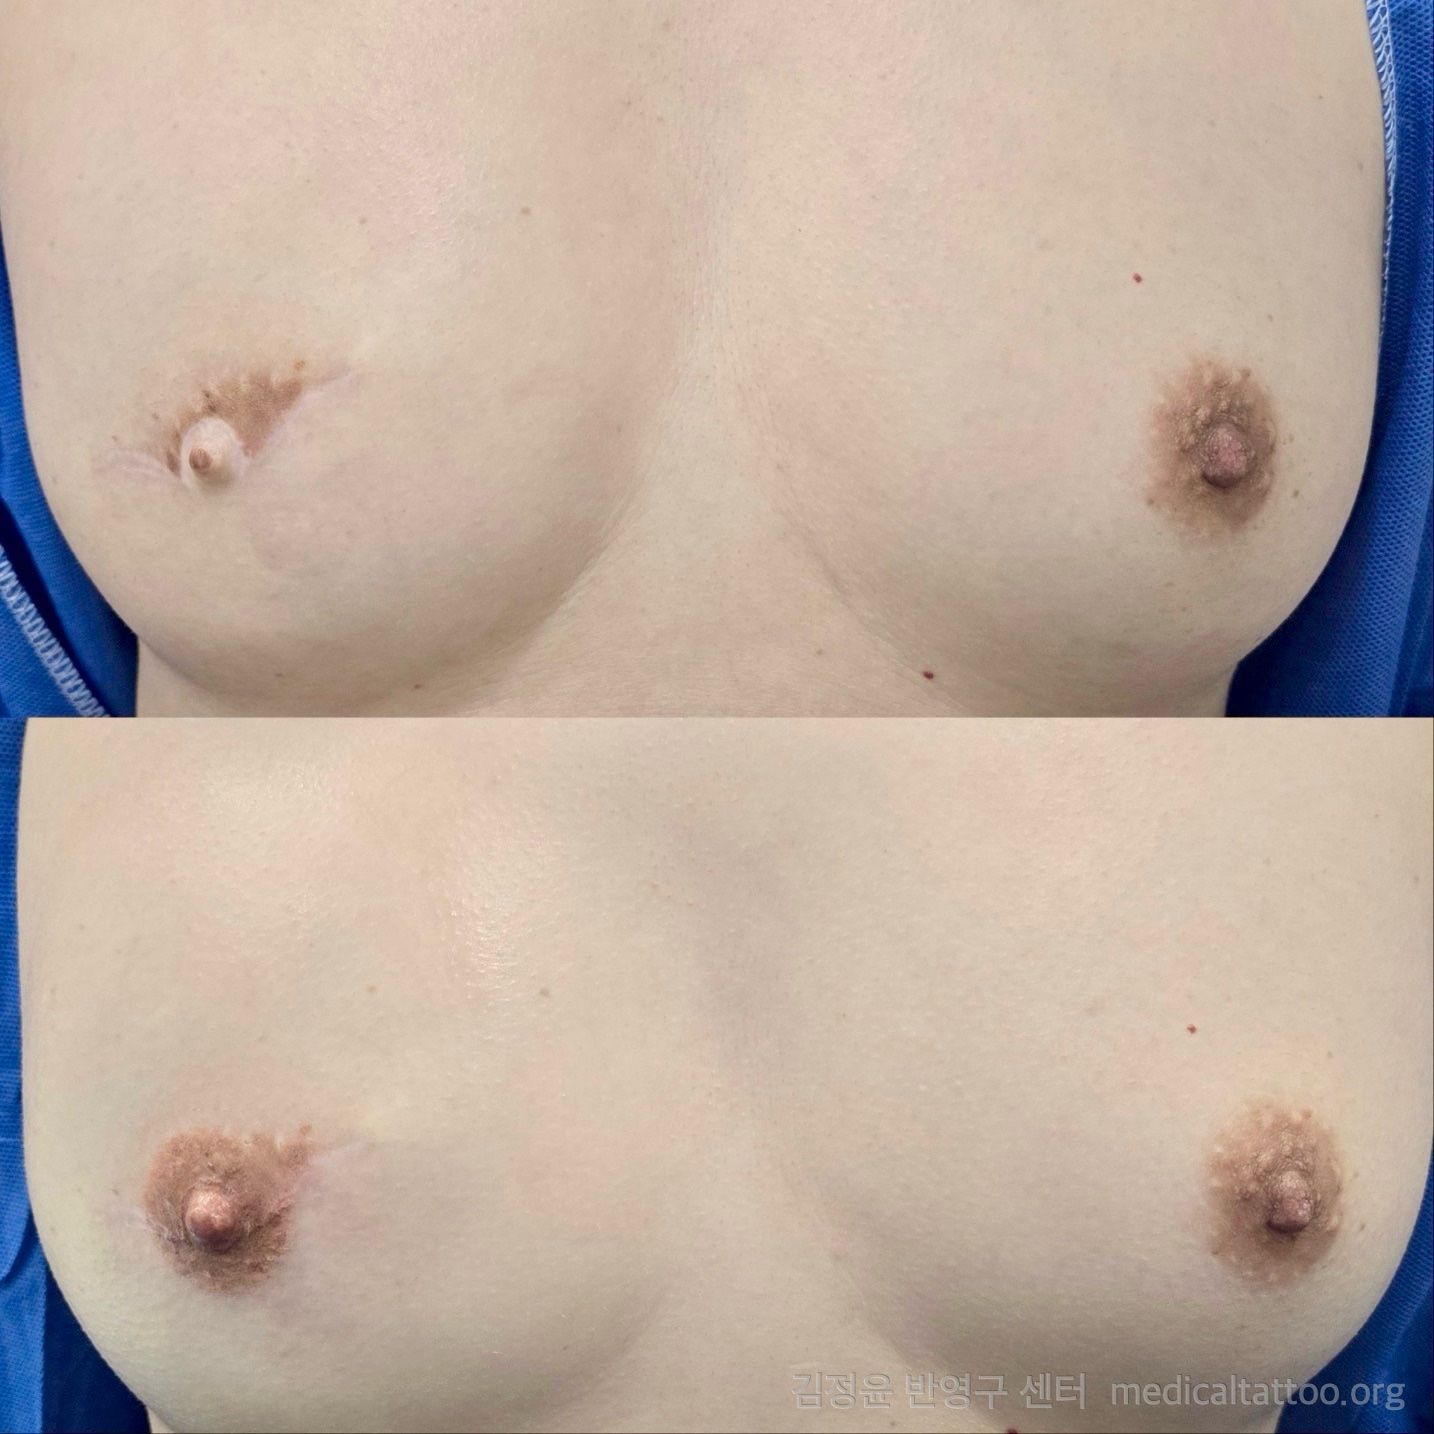
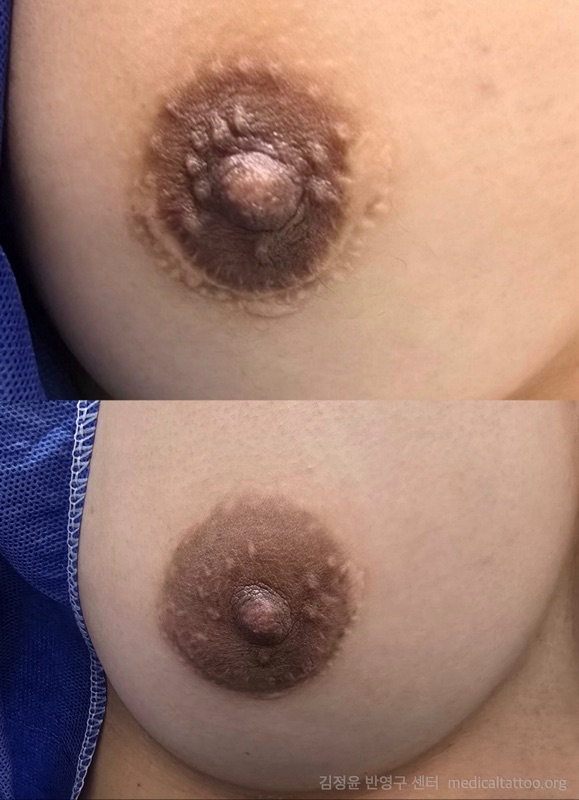
Case C · Enhancing realism after nipple reconstructionAfter completing both breast reconstruction and nipple restoration surgery, the color and three-dimensionality were still insufficient, so tattooing was used to enhance realism. Light-and-shadow techniques were applied over the surgical nipple form, with highlights at the tip to visually emphasize projection. The areola features a natural gradient that fades from center to edge, and the texture of Montgomery glands was reproduced using fine dot work for added realism. Size, color and texture were meticulously matched to the opposite side.
Case D · Extremely light nipple pigment before and after
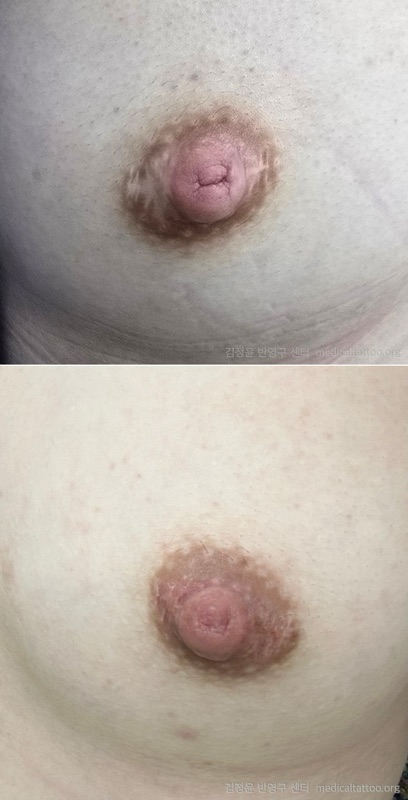
Case D · Extremely light nipple pigmentThe patient was born with very light nipple and areola pigmentation and had been told elsewhere that tattooing would be difficult. Lighter skin contains less melanin, making pigment absorption harder and post-procedure fading more likely. After analyzing the skin type and undertone, pigment concentration and depth were adjusted accordingly. A layered approach was used — a thin base layer in the first session, followed by increased density during the touch-up — achieving natural-looking color retention and bilateral symmetry even on very light skin.
Case E · Correcting asymmetry after autologous tissue reconstruction before and after
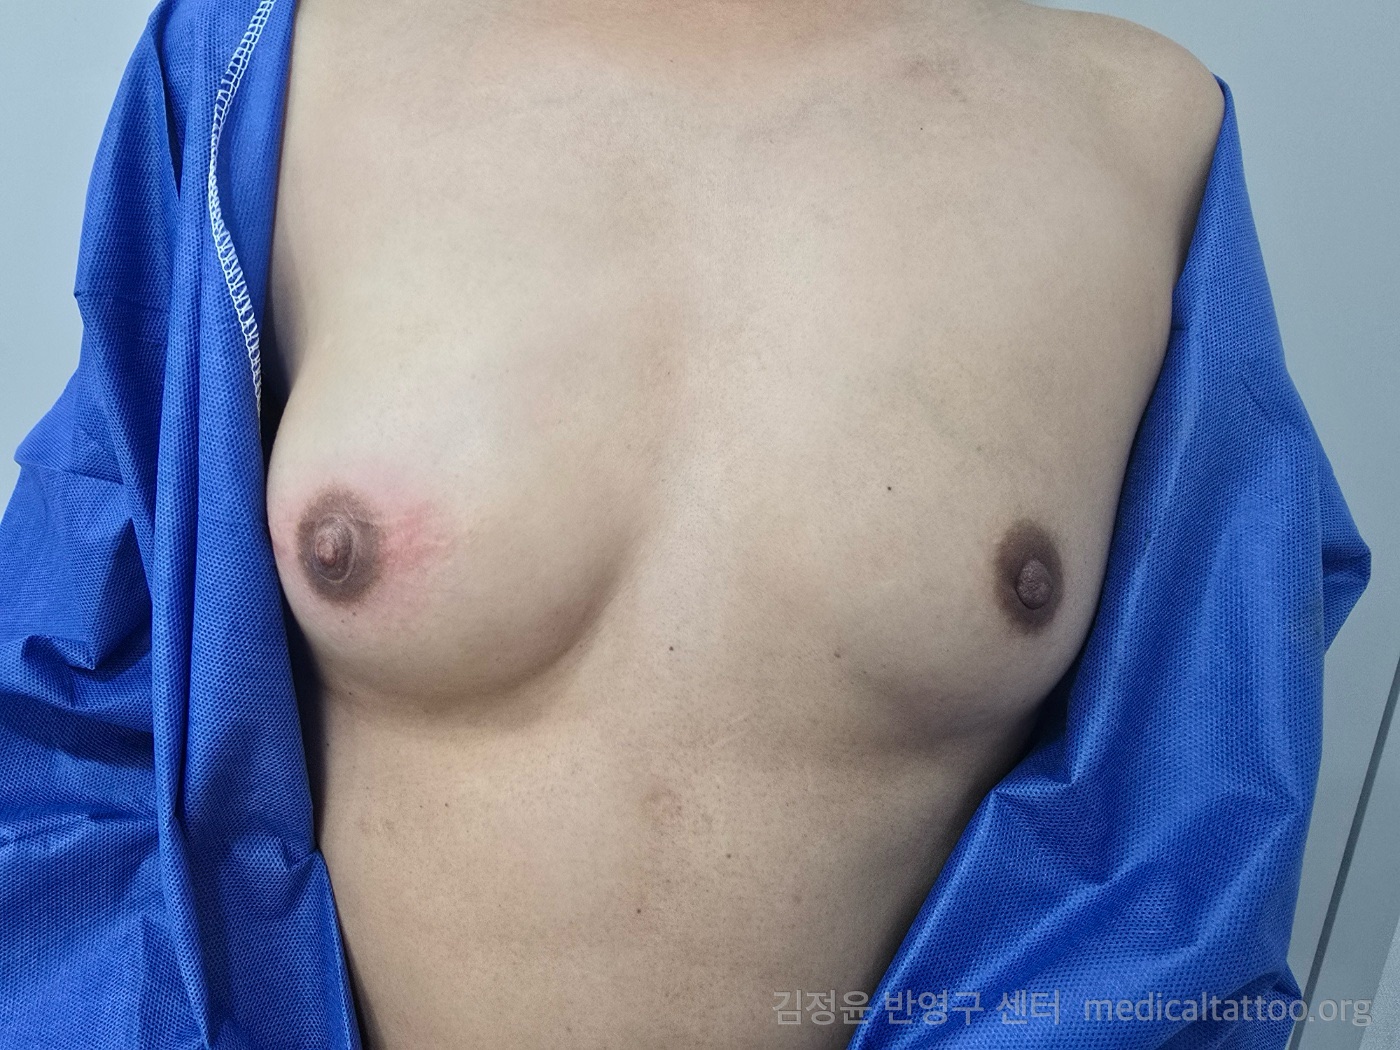
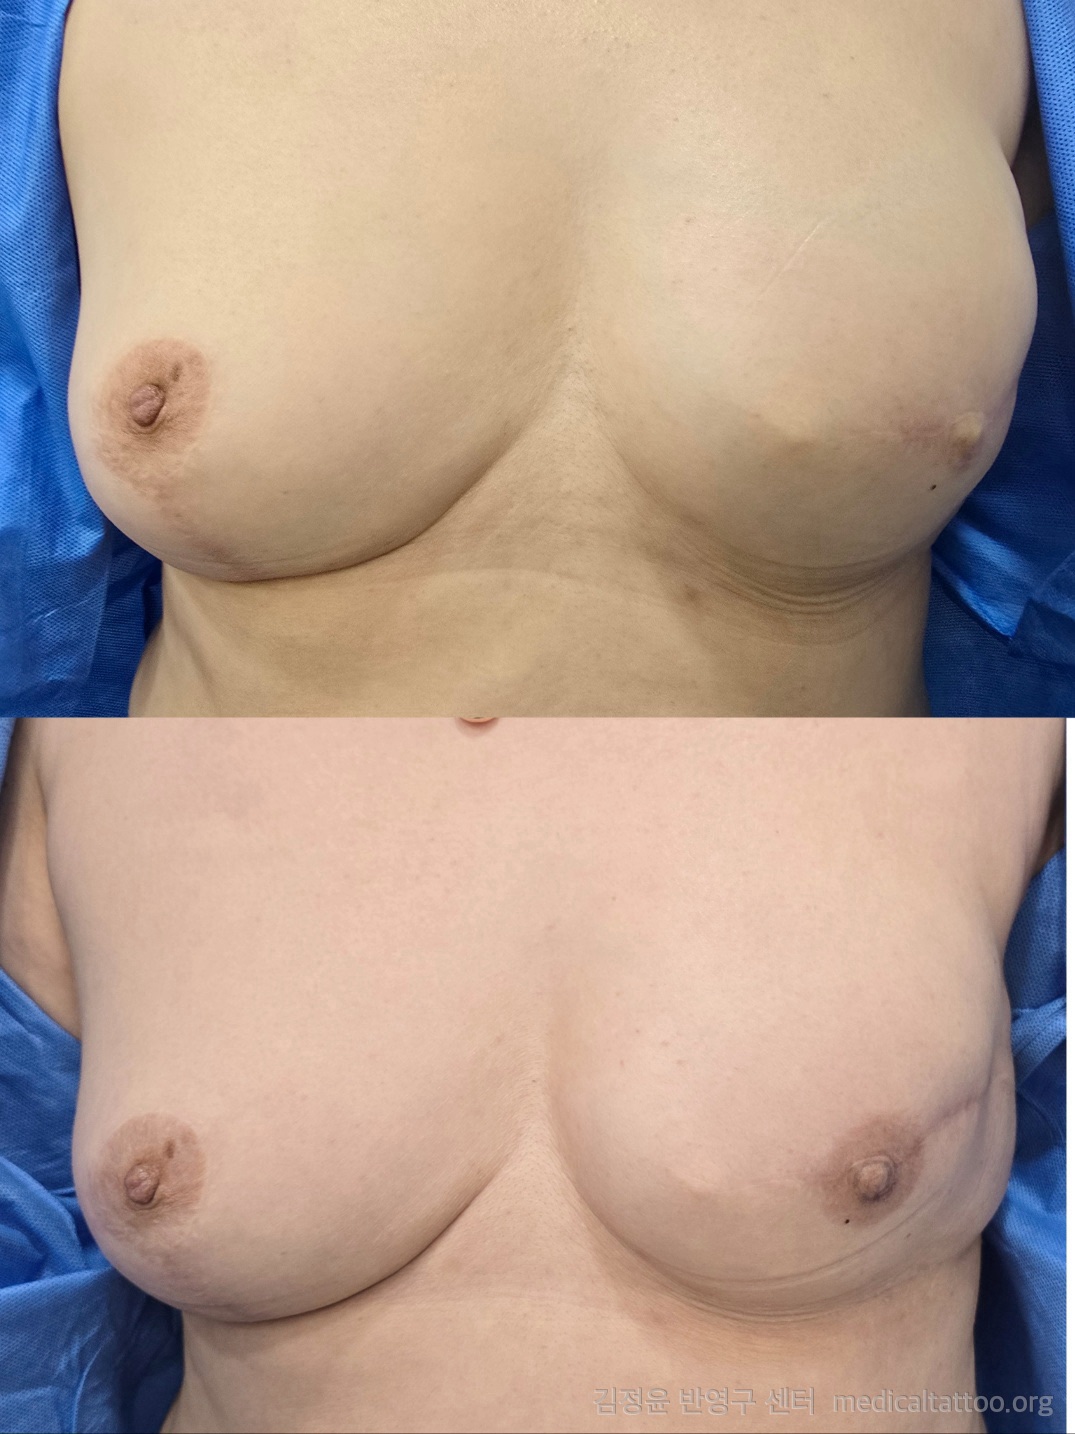
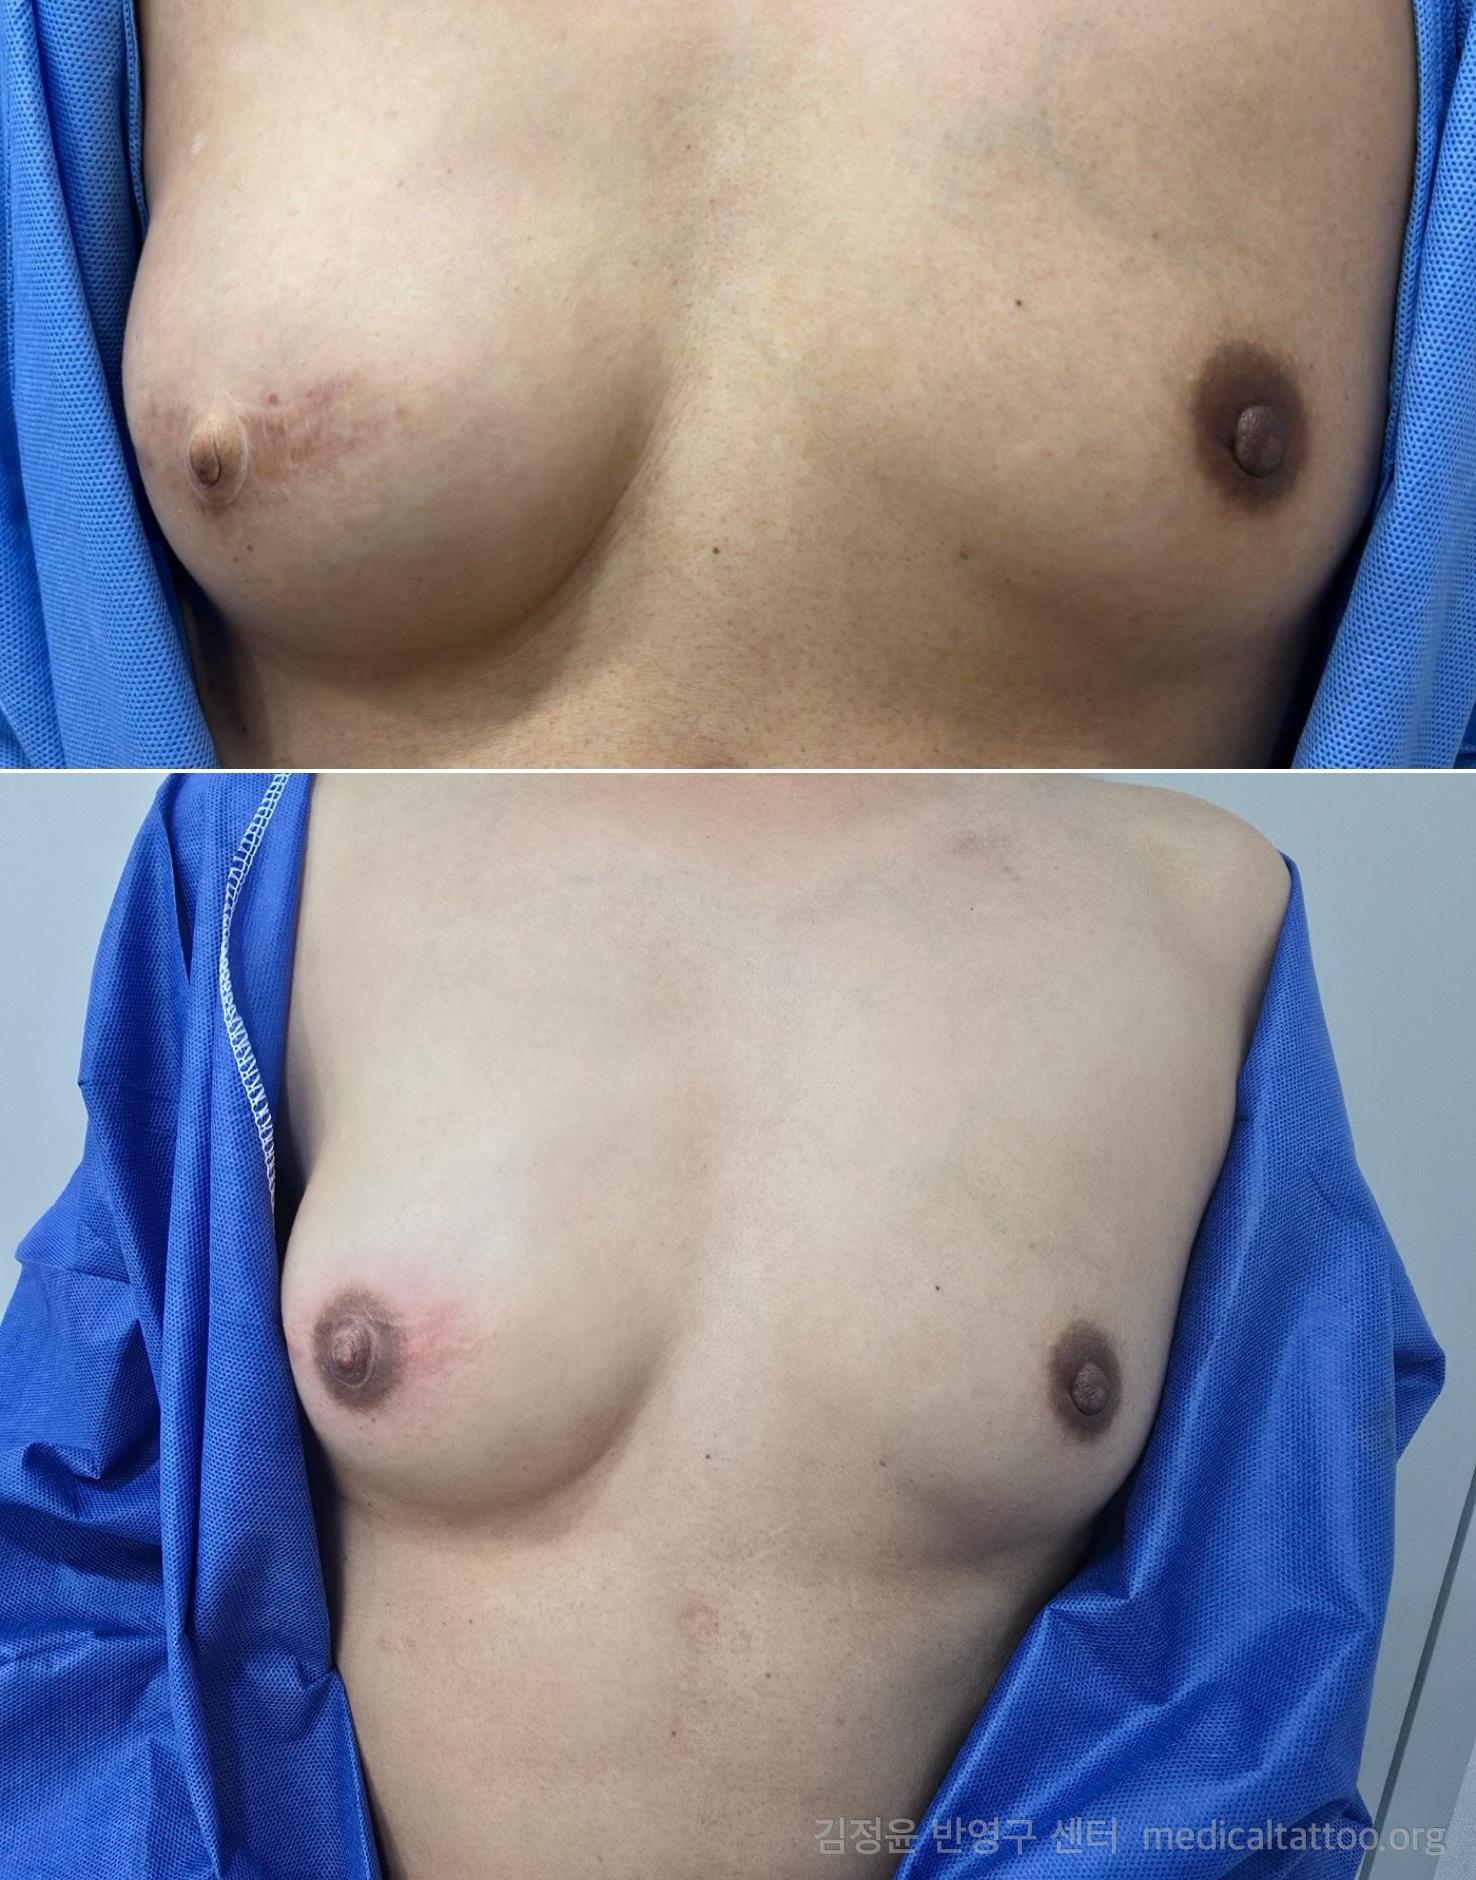
Case E · Correcting asymmetry after autologous tissue reconstructionFollowing DIEP flap breast reconstruction, differences in breast shape and nipple position between the two sides were visually corrected with tattooing. After autologous reconstruction, the transplanted skin often differs in color and texture, and the nipple position may be slightly offset. The areola was strategically designed to visually center the nipple, and the color difference between transplanted and native skin was naturally blended. Both areolae were matched in size and tone for balanced symmetry from the front.
Case F · Flap and skin-graft site before and after
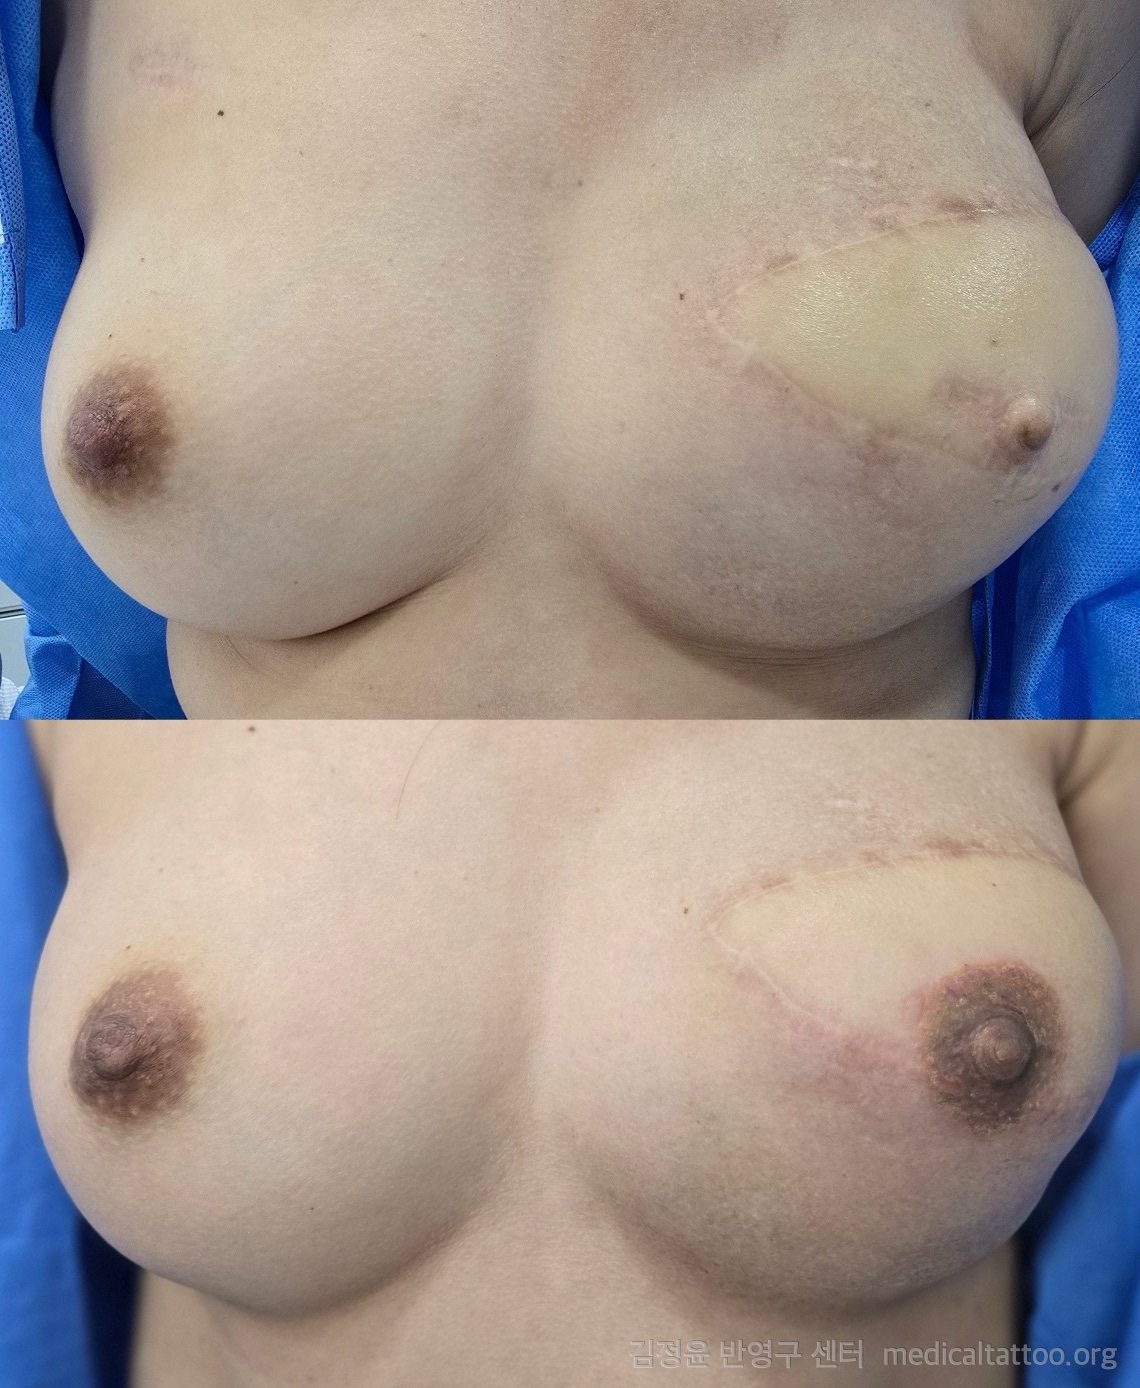
Case F · Flap and skin-graft siteA complex case involving breast reconstruction with an abdominal flap and a back skin graft on the same area. The flap skin, grafted skin and native skin each had different colors and textures, creating visible boundary lines. Pigment concentration and depth were varied across each skin type. Graft boundaries were softened with gradient blending, and the areola and nipple were matched to the opposite side in color and size. Achieving uniform color across different skin types required a staged approach to produce seamless, natural-looking results.
Case G · Thinned skin from tissue expander before and after
Case G · Thinned skin from tissue expanderThe skin had become excessively stretched and thinned from a tissue expander used during breast reconstruction. Thinned skin requires extremely precise depth control — too deep causes pigment migration, too shallow prevents retention. Skin thickness was assessed by palpation, and a finer needle was used at a shallower depth than standard procedures to prevent color spread. Density was adjusted across multiple layers for even pigment distribution. After the first session and a full healing period, final color was refined during the touch-up.
Case H · Volume enhancement after nipple reconstruction before and after
Case H · Volume enhancement after nipple reconstructionThe surgically reconstructed nipple had form but lacked color, making it appear flat. Light-and-shadow techniques were applied over the existing shape to create visual depth. Darker tones were concentrated at the center and lightened outward to emphasize projection. The areola was recreated in the same tone and size as the opposite side. The transition between nipple and areola was carefully blended so the overall result looks as natural as the original.
Case J · After first session · Before touch-up before and after
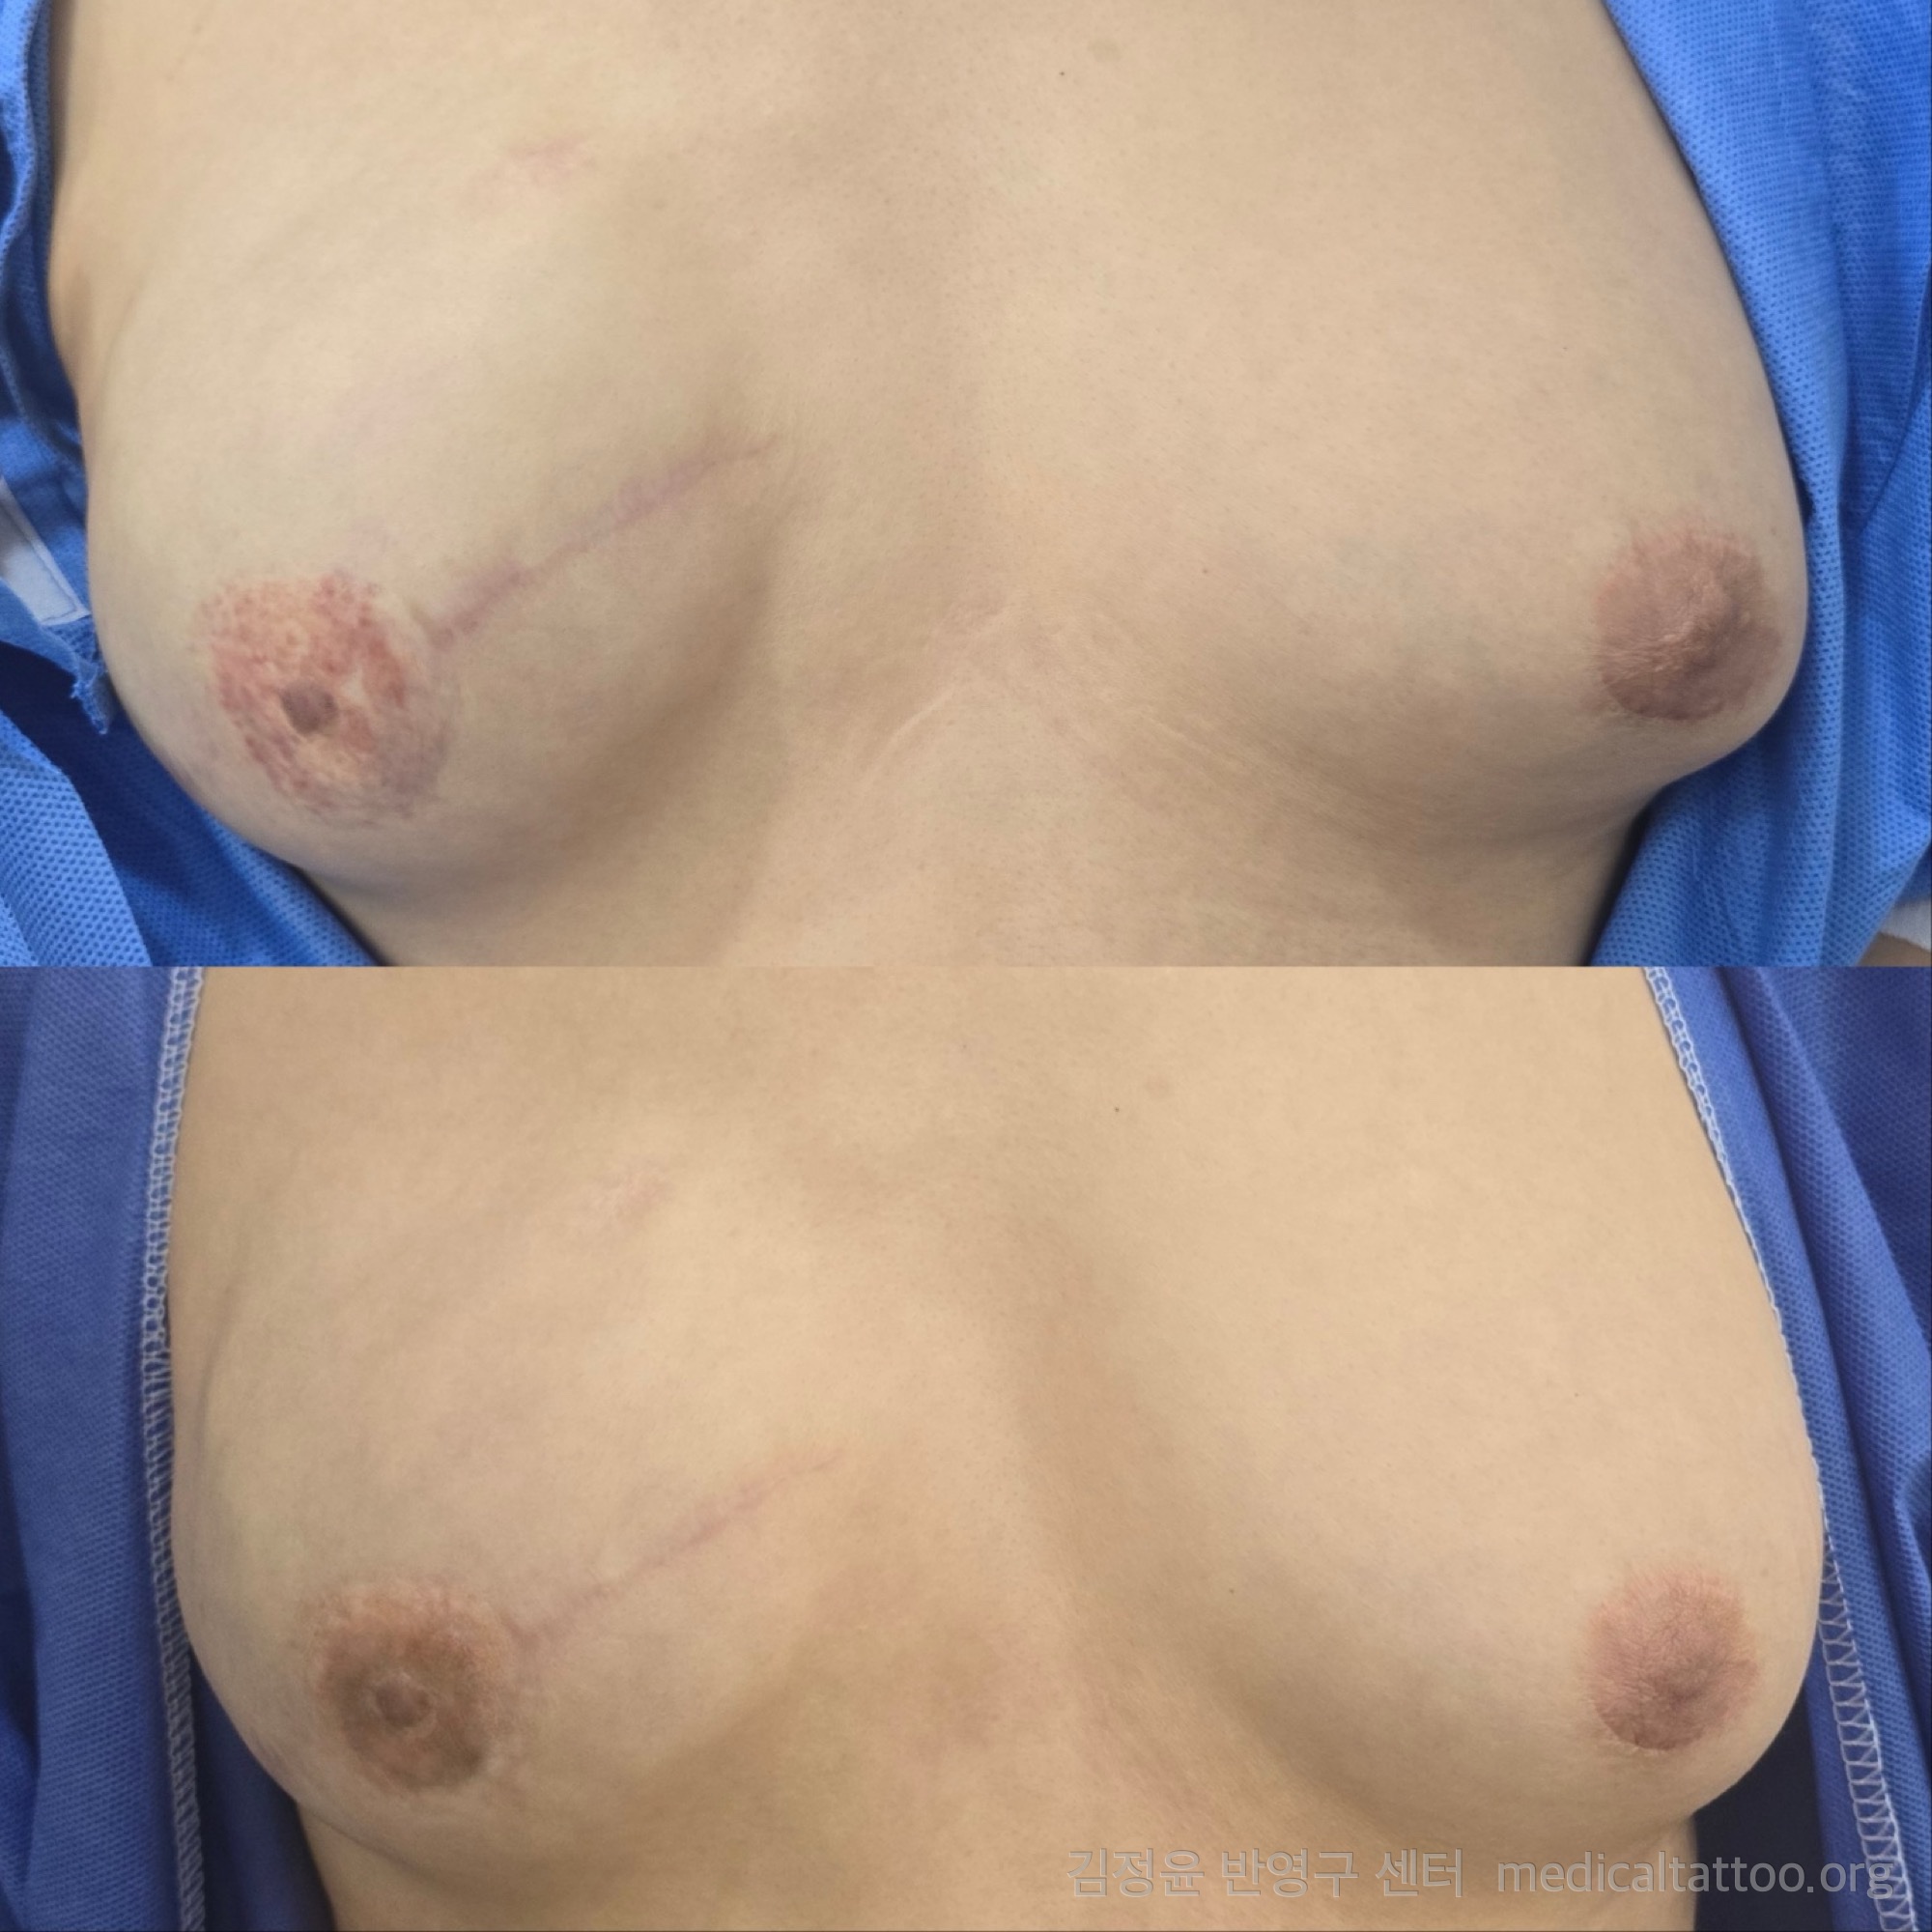
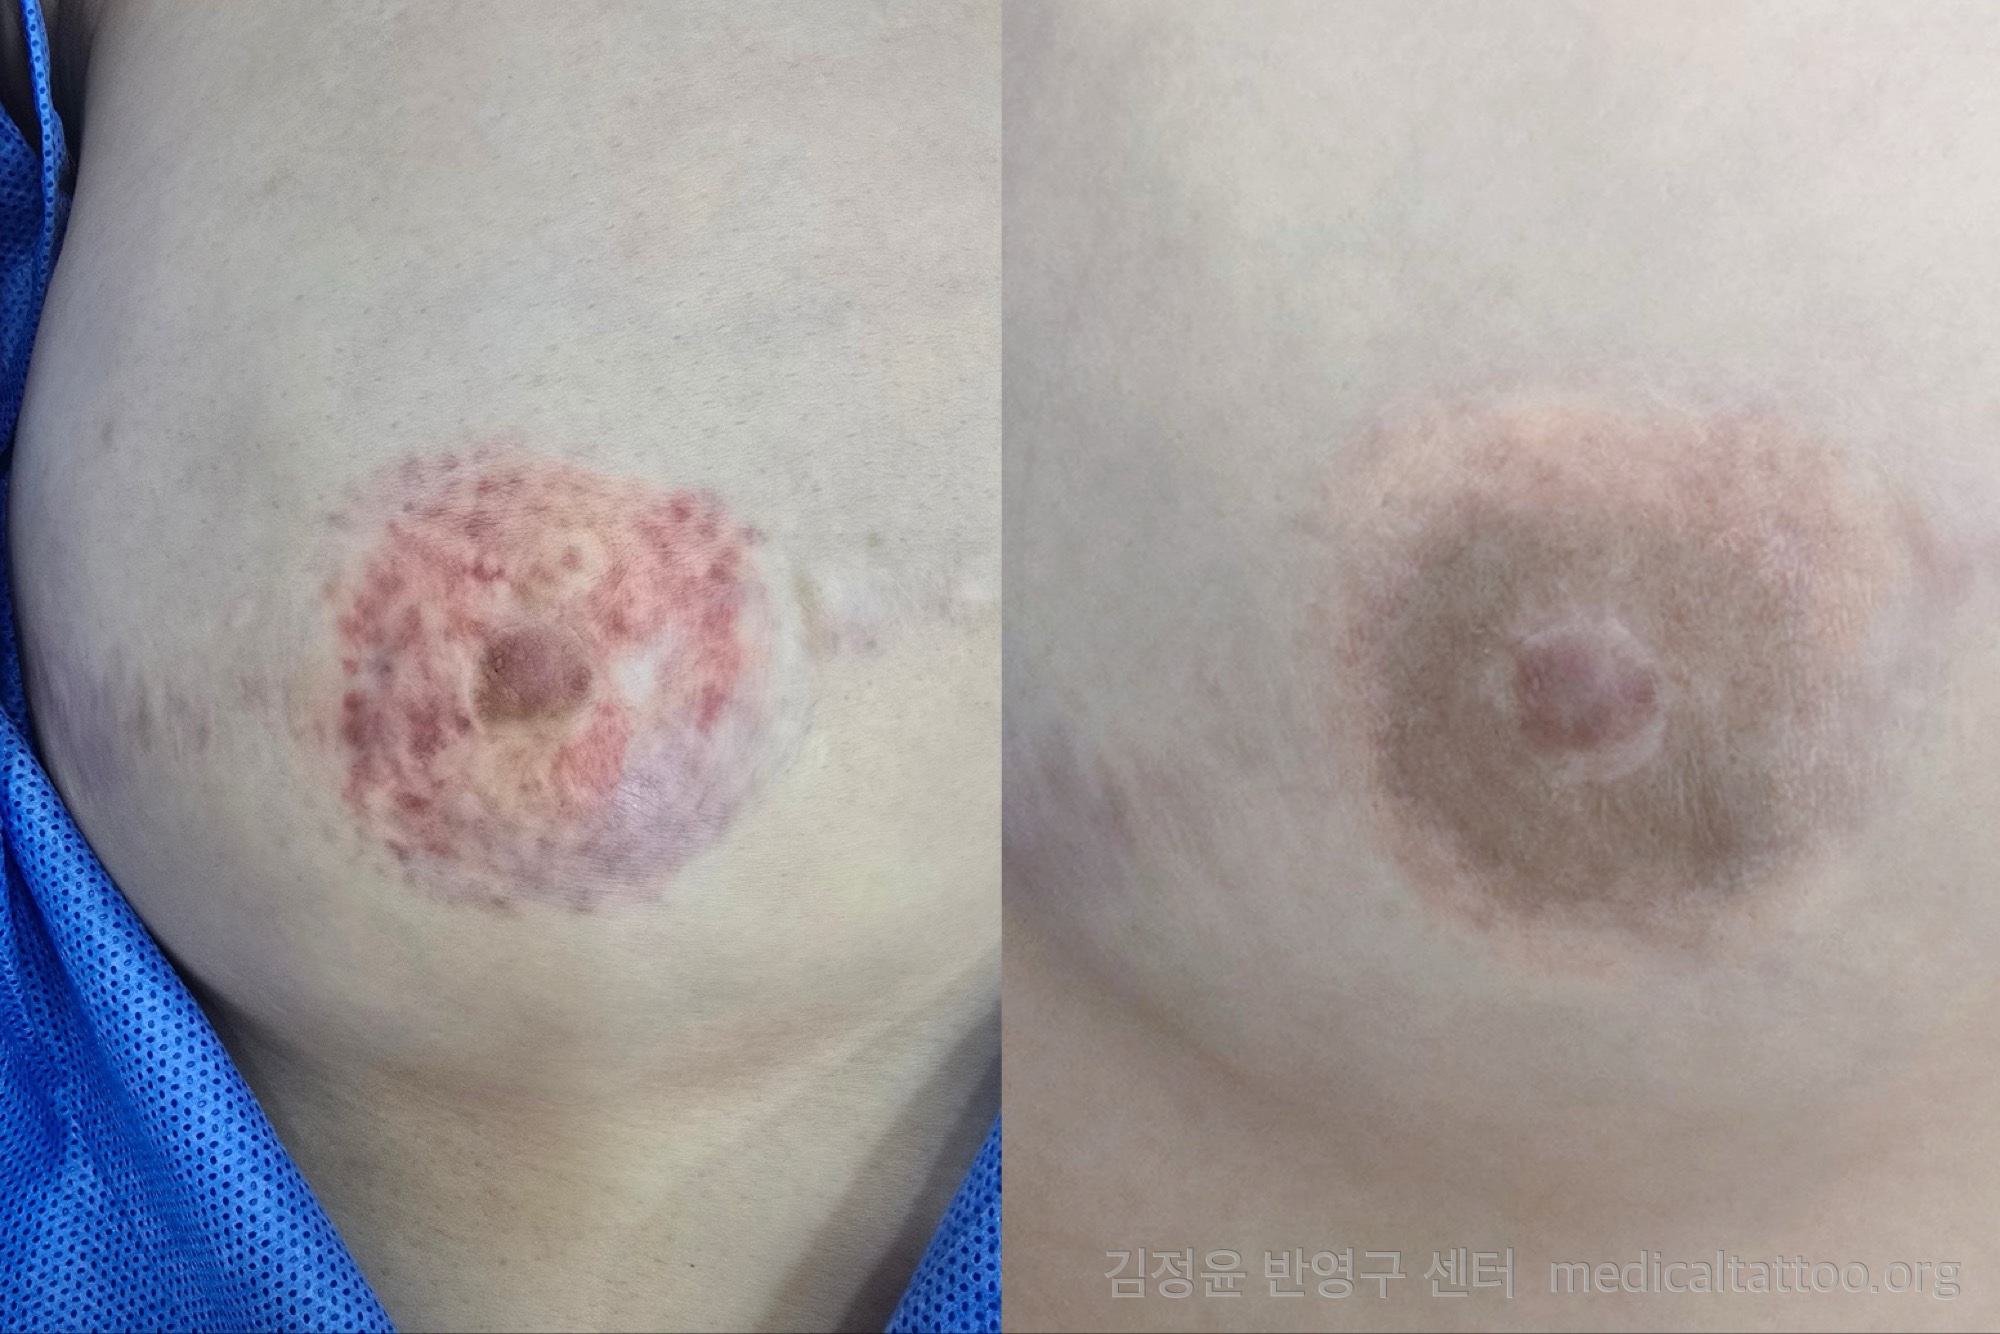
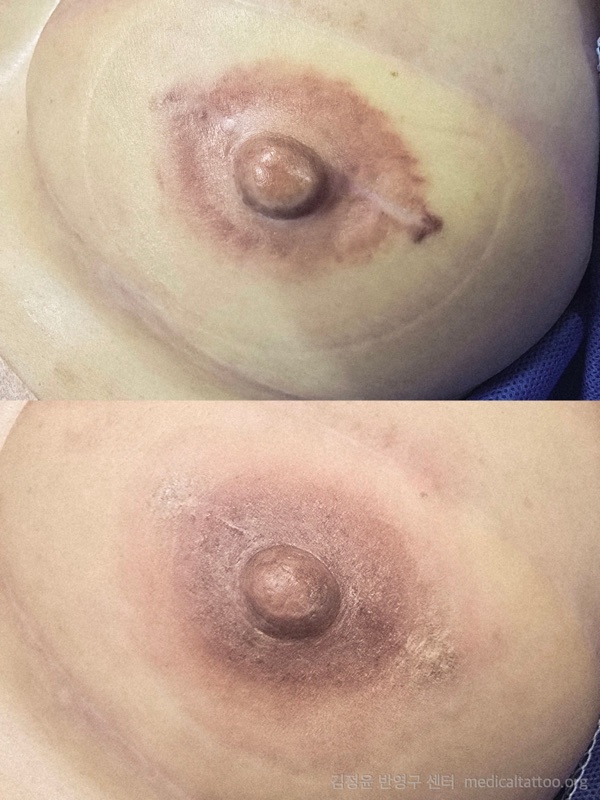
Case J · After first session · Before touch-upThis shows the appearance after the first areola tattoo session, with all scabs fully healed over roughly 4–6 weeks. The first session focuses on establishing the overall shape and base color, and it is normal for about 40–50% of the pigment to shed with the scabs. As shown, the first session already produces a visible areola outline and base tone, though some areas may appear lighter or patchy. The subsequent touch-up addresses these areas, adding density and detail to complete the final result.
Case K · Scar cover after inverted-nipple surgery before and after
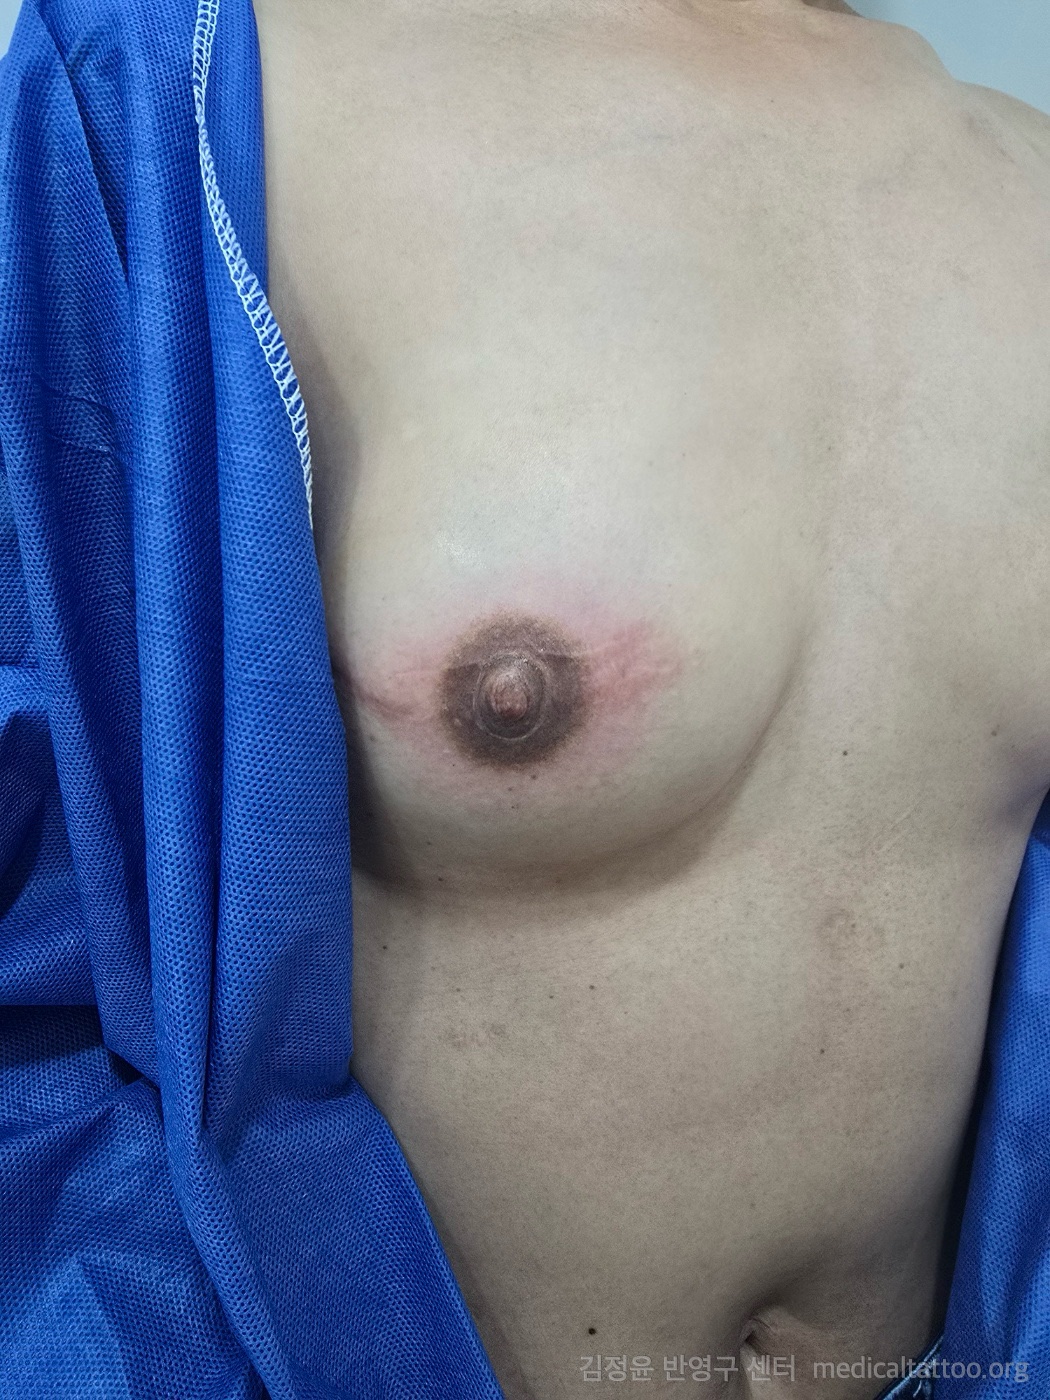
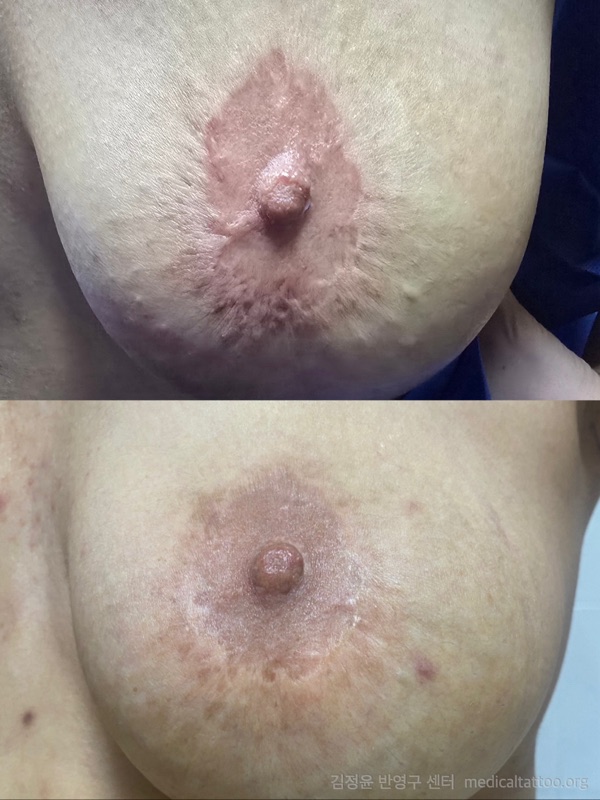
Case K · Scar cover after inverted-nipple surgeryIncision scars and discoloration remaining after severe inverted-nipple correction surgery were covered with tattooing. The surgery involves incisions around the nipple, which can leave noticeable scars that differ in color from surrounding skin. Since scar tissue absorbs pigment differently, separate pigment concentrations and techniques were applied over the scar. The scar line was blended to match the surrounding skin tone, then areola pigment was evenly layered over it so the scar dissolves naturally within the areola. Photo shows the pre-touch-up state.
Case M · Areola and nipple reconstructionAreola and nipple color and dimension were recreated with permanent makeup after breast reconstruction. With no existing areola pigment on the reconstructed breast, the opposite areola served as the reference for precise size, shape and tone measurements. A 3D effect was applied to the nipple using contrast and shading to create a raised appearance. The areola features a gradient that naturally fades from center to edge. Multiple layers of skin-tone-matched pigment were built up for depth, and the result was refined through the first session and touch-up to harmonize with the opposite side.
Case N · Near-total pigment loss after nipple reconstruction before and after
Case N · Near-total pigment loss after nipple reconstructionAlthough nipple reconstruction surgery had created the form, nearly all pigment had faded from the reconstructed tissue, leaving the nipple barely visible. Tissue shrinkage and pigment loss over time after reconstruction is common, so tattooing was used to add color and volume. Natural pigment was applied over the existing nipple form while emphasizing surrounding shadows for a three-dimensional appearance. The areola was also matched in size and color to the opposite side, creating a seamless connection between surgical reconstruction and tattoo enhancement.
Case O · Realistic finish after hospital nipple reconstruction before and after
Case O · Realistic finish after hospital nipple reconstructionAfter completing both breast reconstruction and nipple restoration at a university hospital, tattooing was added for a more lifelike finish. Surgery alone achieves form and projection but cannot fully replicate the natural coloring and fine texture of a nipple. Multi-layer pigment techniques were applied over the surgical result to recreate natural color distribution, including subtle color transitions at the areola border. Montgomery gland texture and fine nipple surface detail were rendered with dot work for high realism. This case demonstrates the most natural result achievable when surgical restoration and tattoo enhancement are combined.
Case P · Areola restoration 20 years post-surgeryThe areola had completely faded after breast surgery performed 20 years ago. While the surgical site had long since stabilized, reduced skin elasticity and tissue changes required a different approach than standard areola procedures. After carefully assessing skin thickness and elasticity, pigment concentration and depth were adjusted, and the tone was designed to match the current color of the opposite areola. The key was matching the naturally aged color of the opposite side, with center-to-edge tonal variation creating a three-dimensional areola reconstruction.
Case Q · Full process: first session through touch-up before and after
Case Q · Full process: first session through touch-upThis case shows the complete process from the first areola tattoo session through the finished touch-up after breast surgery. The first session establishes the overall shape and base tone, followed by a 4–6 week stabilization period for pigment settling. During this time, about 40–50% of color naturally sheds through scabbing, and the touch-up increases density where needed and adds detail based on the remaining color. The touch-up refines areas of uneven retention, fine-tunes nipple shading and areola border gradients. Comparing the first session and touch-up results illustrates the full areola tattoo settling process.
Case R · Scar cover after periareolar augmentation before and after
Case R · Scar cover after periareolar augmentationA breast augmentation (implant) performed through an incision at the lower areola border left a visible surgical scar. The scar running along the areola-skin boundary made the areola outline appear irregular. After analyzing the scar tissue color and texture, areola pigment was applied over the scar to restore a natural circular border. Since scar tissue can absorb pigment unevenly, multiple staged sessions were used to build uniform density, carefully matching the surrounding areola color and tone. After treatment, the scar blended seamlessly into the areola, making the surgical mark virtually invisible.
Case S · Scar cover after periareolar mastopexy before and after
Case S · Scar cover after periareolar mastopexyAfter a breast lift (mastopexy) performed with periareolar incisions, the scars had widened and stretched over time, distorting the areola border. Mastopexy scars run circumferentially around the areola, which can make the areola itself appear misshapen. The scar area's color and texture were analyzed, and the design focused on re-establishing a natural circular areola boundary. Areola color was extended over the stretched areas to create a refined, properly sized shape, with gradient blending at the edges for a soft finish. After treatment, the scarring and distortion were naturally concealed, restoring an appearance close to the pre-surgery areola.
Case T · Areola size correctionThe areolae differed in size and color between sides, or one was congenitally small and pale, creating noticeable asymmetry. While some size and color difference between areolae is common, significant disparity can become a cosmetic concern. Both areolae were precisely measured for current size, color and shape, and the treatment was designed to enlarge or add color to match the reference side. Pigment was naturally extended beyond the existing areola to achieve the desired size, with a gradient edge to avoid a sharp boundary. After treatment, both areolae were uniformly matched in size and color, significantly improving symmetry.
Case U · Restoration of a previous areola tattooAfter breast cancer surgery, an areola tattoo performed at another provider had left uneven, patchy pigment and an unnatural shape. The existing tattoo had areas of clumped and faded pigment creating a blotchy appearance, and the areola border was irregular and lacked naturalness. The existing pigment distribution and tone were analyzed; over-saturated areas were toned down with neutralization techniques before uniform color was layered across the entire area. The areola border was redesigned into a clean circle, and shading was added to the nipple for three-dimensionality. The previous work's unevenness was fully corrected, achieving a natural result as if performed from scratch.

※ Results vary depending on skin condition, scar tissue, and lifestyle. Redness, swelling, scabbing, or itching may occur after the procedure, and some color loss requiring a touch-up is normal. Expected outcomes and precautions are fully explained during the pre-procedure consultation.

FAQ

Areola Reconstruction FAQ

How is this different from a silicone nipple prosthesis?

A prosthetic must be attached and removed each time, while a tattoo is part of your skin — no worries during showers or exercise. However, a tattoo creates the illusion of volume through shading rather than actual projection. We'll compare both options during consultation.

How long after surgery can I have this done?

We recommend waiting until the area has fully stabilized — typically 6–12 months after surgery. If you've had radiation therapy or your skin is thin, a longer wait may be advisable.

Is it painful?

Reconstructed areas often have reduced sensation, so most patients report little pain. If you feel discomfort during the procedure, we can pause at any time.

How long does the color last?

Vivid results typically last 3–5 years, then gradually lighten. The 6-week touch-up extends longevity, and light maintenance every 1–2 years keeps the color and dimension looking fresh.

My reconstructed nipple has flattened over time. Can you help?

Nipple flattening after reconstruction is a natural process as transplanted tissue is reabsorbed. Our 3D shading technique can make the nipple appear two to three times its current height, achieving a natural result without re-surgery.

A hospital told me I'm not a candidate. Is it still possible?

We have experience working on very thin skin and very light pigment. That said, not every case is suitable, so we'll assess via photo or in-person consultation first.

I had an areola tattoo elsewhere but the color shifted or it's asymmetric. Can it be corrected?

Yes. We've corrected cases with reddened color shifts and size/position mismatches using complementary color correction and design adjustments. Send us a photo first and we'll advise on what's possible.

Can I have an MRI?

Yes, with no concerns. We use organic medical tattoo pigments that do not interfere with MRI scans, including routine breast cancer follow-up imaging.

I have implants. Is the procedure possible?

Yes. Whether you have tissue grafts or implants, the procedure is the same. The needle reaches only just below the skin surface, so there is no risk of damage to implants or grafted tissue.

Can scars from areola reduction surgery be covered?

Yes. Scars along the areola border from reduction, lift, or augmentation surgery can be softened with a gradient that fades naturally outward.

Is this available for men or transgender patients?

Yes. We work with male breast cancer and trauma patients, congenital absence, FtM top-surgery refinement, and MtF augmentation. Pigments are individually mixed to match each patient's skin tone and desired result.

Are there any side effects?

We perform an allergy patch test before the procedure and use safety-certified organic pigments. In rare cases, pigment may migrate slightly along scar tissue, or patients with strong keloid tendencies may develop minor scarring. All risks are discussed during the pre-procedure consultation.

Recovery

Healing process & aftercare

  1. Day of procedure – Day 2We apply a waterproof bandage. Mild redness and swelling are normal and subside within a few days. You can shower with the bandage on.
  2. Days 3–7Remove the bandage and gently wash, then air-dry. Thin scabs may form and itch — do not pick or scratch. Apply the provided moisturizer with a sterile cotton swab.
  3. Weeks 1–2Scabs fall off naturally. The color may appear lighter than immediately after the procedure — this is normal.
  4. 6 weeks — Touch-upOnce the deeper skin layers have healed, the touch-up refines color and texture on the base established in Session 1.

Full surface healing takes about 2–3 weeks; deeper-layer recovery takes 6–8 weeks. Avoid sun exposure on the treated area and do not apply products other than the prescribed moisturizer.

Life after the procedure

Back to everyday life

"Going to the bathhouse is fun again!"

"I took my child to a water park!"

"I visited a Japanese hot spring with my family!"

Activities you may have avoided since breast cancer surgery become possible again. This is more than restoring appearance — it's about reclaiming your daily life and confidence.

Pre-visit consultation

We recommend a photo consultation first

If you're traveling from far away or want to check eligibility, send photos by phone or KakaoTalk for a preliminary assessment.

Step 1 — Send photos

Take photos of the reconstruction area in natural light. One frontal shot showing both sides and one close-up of the area to be treated is sufficient.

Step 2 — Assessment

After reviewing the photos, we'll advise on eligibility, expected number of sessions, and approximate cost.

Step 3 — Book a visit

If you decide to proceed, we'll schedule your appointment. During the visit, we examine the skin in person and begin the design.

Book a Consultation

Start with a phone call

Tell us about your surgery, the area of concern, and the result you're hoping for. We'll let you know whether the procedure is right for you, along with scheduling and pricing. All sessions are by appointment only.

Call 010-4650-4912 KakaoTalk coming soon
Call us KakaoTalk coming soon